Working Abroad (Wabro) - online service
Before you start
What is Working Abroad?
Working Abroad is an online service through which an employer can request an A1 Attestation or a Certificate of Coverage when posting a Belgian employee abroad for a limited time. Normally speaking, employees are covered by the social security legislation of the country where they work. An A1 Attestation or a Certificate of Coverage will serve to prove that Belgian social security remains applicable to a Belgian employee posted outside of Belgium.
How to get access to secure online services
Working Abroad is a secure online service. This means that you need to request a secure access to the Belgian Social Security – Enterprise portal in order to use it.
- Go to the registration page of the Social Security – Enterprise portal (in French) and click on the option for companies registered as employers (Mon entreprise est enregistrée comme employeur).
- Click on the option I want to manage my obligations towards the NSSO myself (Je souhaite traiter moi-même mes obligations administratives envers l’ONSS) on the NSSO registered companies page on the Social Security – Enterprise portal (in French).
- Follow the guidelines and assign a Chief Access Manager in CSAM. CSAM is available in English.
Employee data you need in order to make a request in Working Abroad
In order to request a document for a Belgian employee in Working Abroad, you will need the following:
- The employee’s Social Security Identification Number (SSIN). In Belgium, this number is identical to the ‘identification number of the National Register’ to be found on the back of the employee’s Belgian ID card.
- A Dimona declaration proving that the employee is in your employ at the time of the posting. Dimona is the online service in which you must declare every person entering or leaving your employ.
We recommend also activating your e-Box Enterprise, which will make an exchange of documents with the National Social Security Office (NSSO) much easier.
How to log in to Working Abroad
- Click the button in the menu of the 'Working Abroad' page of the Social Security – Enterprise portal (in French).
- You arrive on the access page to the secure services. Choose your preferred login method to access Working Abroad.
- You arrive on the Working Abroad home screen.
What actions can you undertake in Working Abroad?
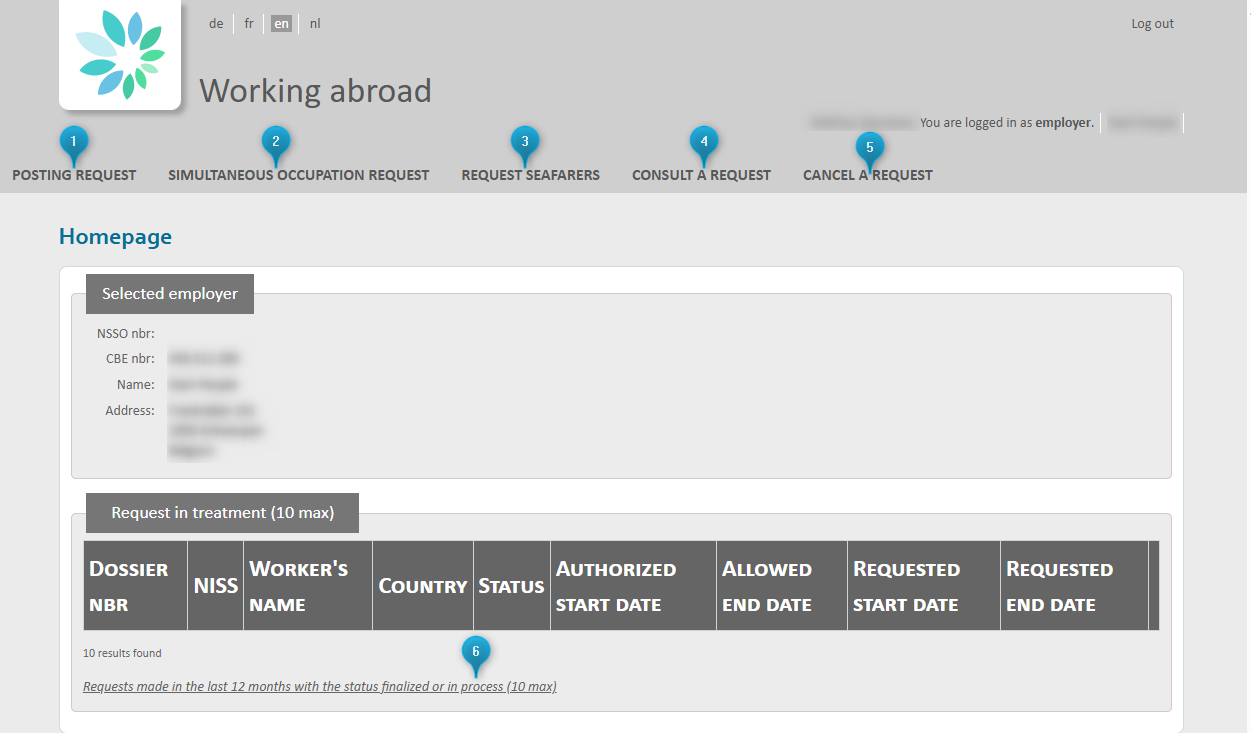
You can do the following in the online service:
- Request a posting abroad (Posting request). This is where you request a certificate of coverage if your employee is going to work in one country that is not Belgium, for a precise period of time.
- Request employment in multiple countries simultaneously (Simultaneous occupation request). This is where you request a certificate of coverage for an employee who is going to work in several countries at once during a given period (Belgium + another country, or several countries that are not Belgium).
- Request a voyage for a seafarer (Request seafarers)
- Consult your requests (Consult a request)
- Cancel a request (Cancel a request)
- Search existing requests made by your organisation.
How will your request be processed?
The online service will take you through four steps in order to request an A1 or Certificate of Coverage for an employee.
Once your request has been registered in the online service, the NSSO will check it.
If the posting is validated, you will receive an A1 Attestation or a Certificate of Coverage in your e-Box Enterprise.
Request a posting abroad under the ‘Posting request’ tab.
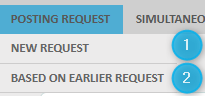
You can 1) start a request from scratch (New request), or 2) base your request on an existing one (Based on earlier request). In the latter case, you will be reusing existing data.
In this manual, we will show you how to make a request from scratch. To request a posting, you will fill out four screens. It is possible at each stage to go back to the previous screen by clicking ‘Précédent’, and to cancel your request by clicking ‘Annuler’.
Identifying the employee
Please note: you may only request a posting for a person who is in your employ during the entirety of the period you are requesting. The requested period of employment abroad must be covered by a Dimona declaration.
You can look up your employee based on their Social Security Identification Number (SSIN) or on their name.
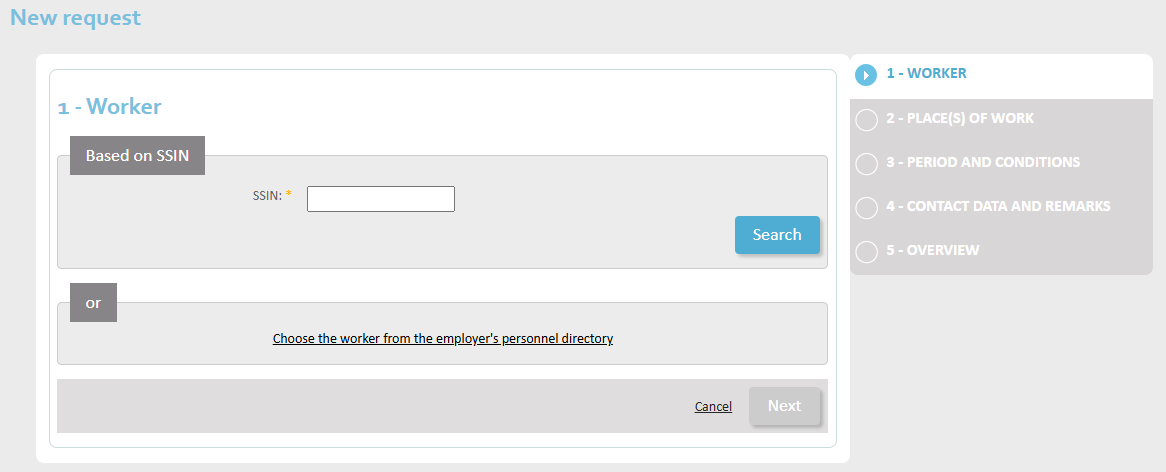
Enter the SSIN in the field labelled ‘SSIN’ and click Search (Rechercher).
Alternatively, click ‘Choose the worker from the employer’s personnel directory’ for a name-based search. You can enter the family name or part of the family name (e.g. ‘por’ will find ‘Delporte’). The search is not case sensitive. Next, click Search (Rechercher) to find your employee.
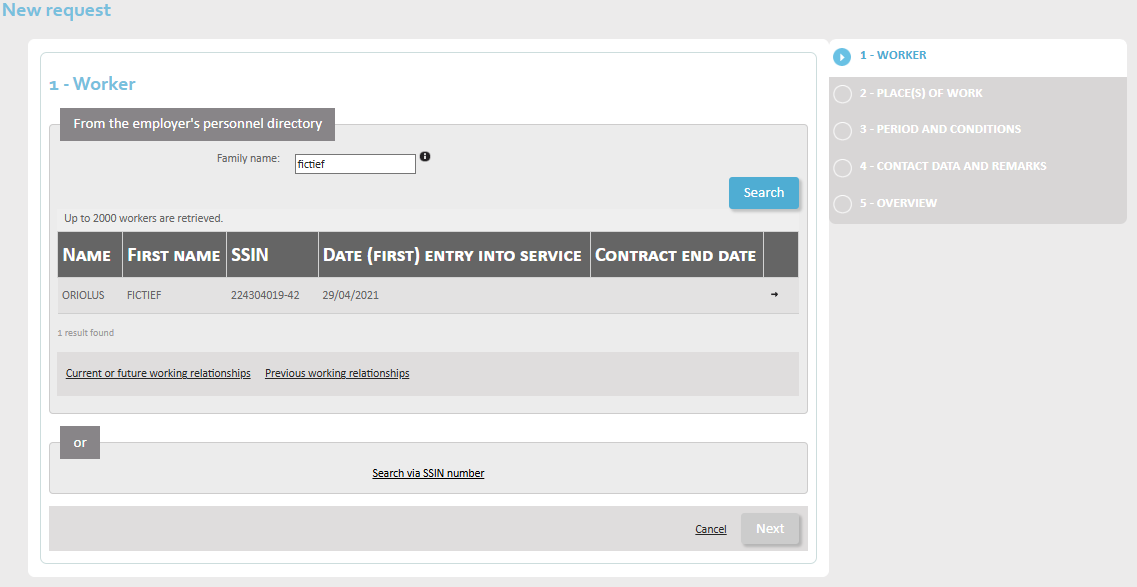
A list of results is displayed. Select the person you want by clicking the small arrow button next to the employee’s personal data.
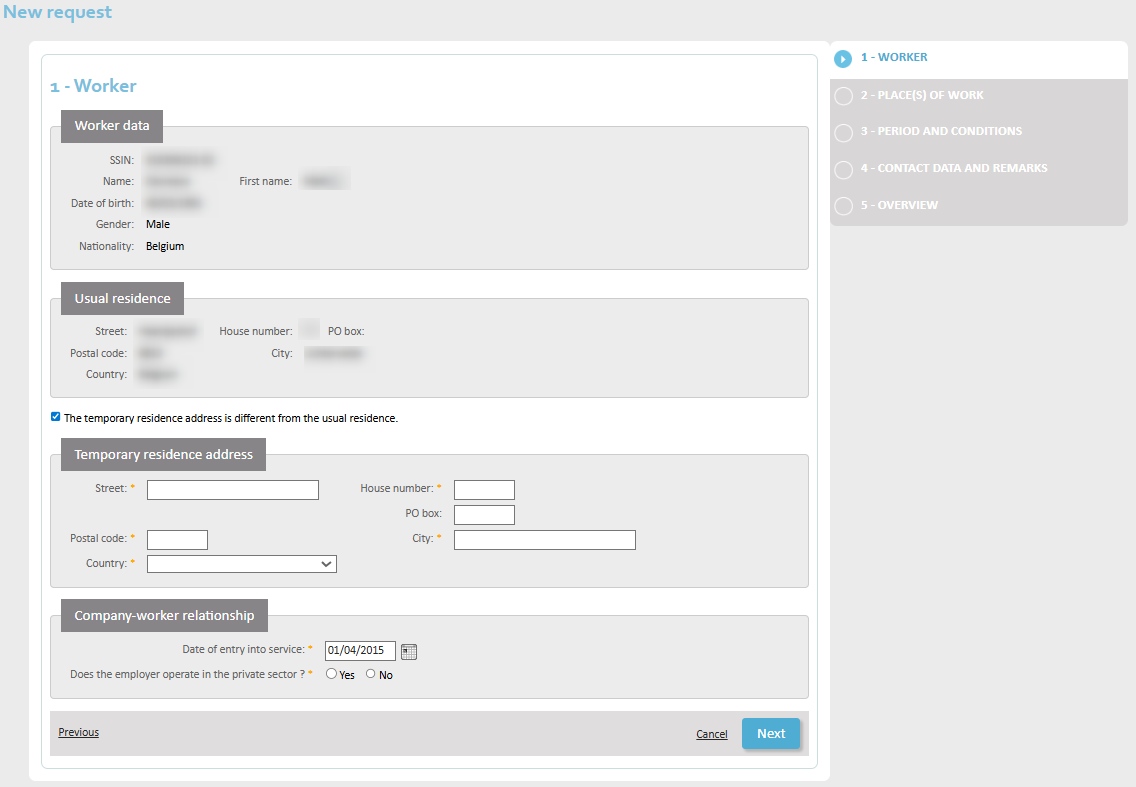
If the employee has a temporary address that differs from their home address, check the box ‘The temporary residence address is different from the usual residence’ and enter the temporary address under ‘Temporary residence address’.
Enter the following data:
- Street
- Number
- PO box – if applicable
- Postal code
- City
- Country
Under ‘Company-worker relationship’, select the date the employee entered your service (Date of entry into service). You must also indicate whether or not you are an employer in the private sector.
When you are ready, click Next (Next).
Determining the place(s) of employment
Select the destination country in the ‘Pays’ dropdown. You can add another place by clicking Add place of employment (Add place of work).

Click Next (Next). You will now enter the details of the place(s) where the employee will be working.
Choose the location type in the Type dropdown:
- Region – if there is no fixed address in the other country
- Company
- Construction site
- Homebase – for aviation
- Inland vessel – for river shipping
- Ocean vessel – for maritime shipping
Depending on the location type, you will need to complete different screens.
Type: Region
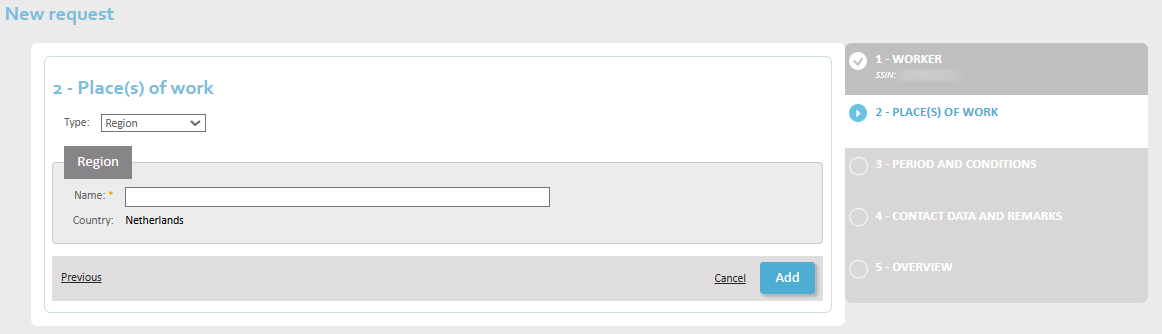
Enter the name of the region in the Name field.
Now click on Add to add this place of work.
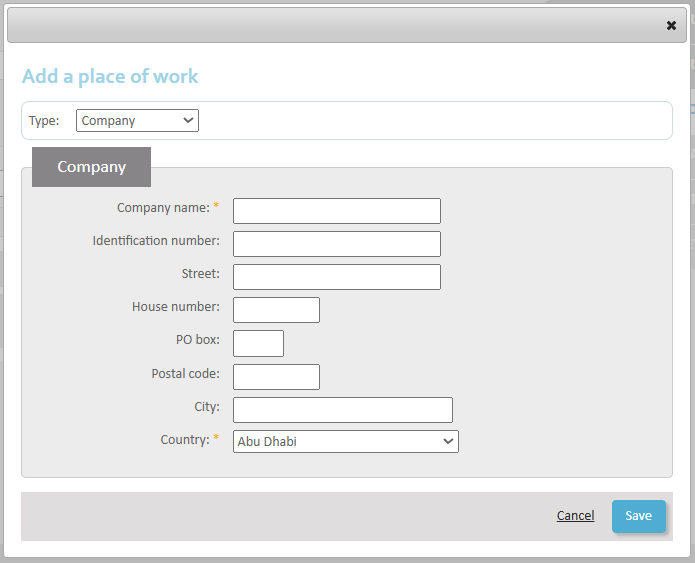
Type: Company (office work)

Complete the data:
- Company name (Name)
- Identification number
- Street
- House number
- PO box – if applicable
- Postal code
- City
Now click on Add to add this place of work.
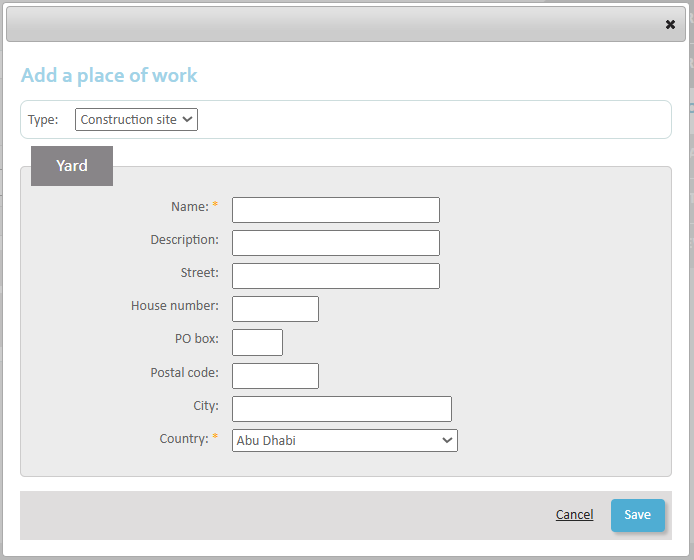
Type: Construction site
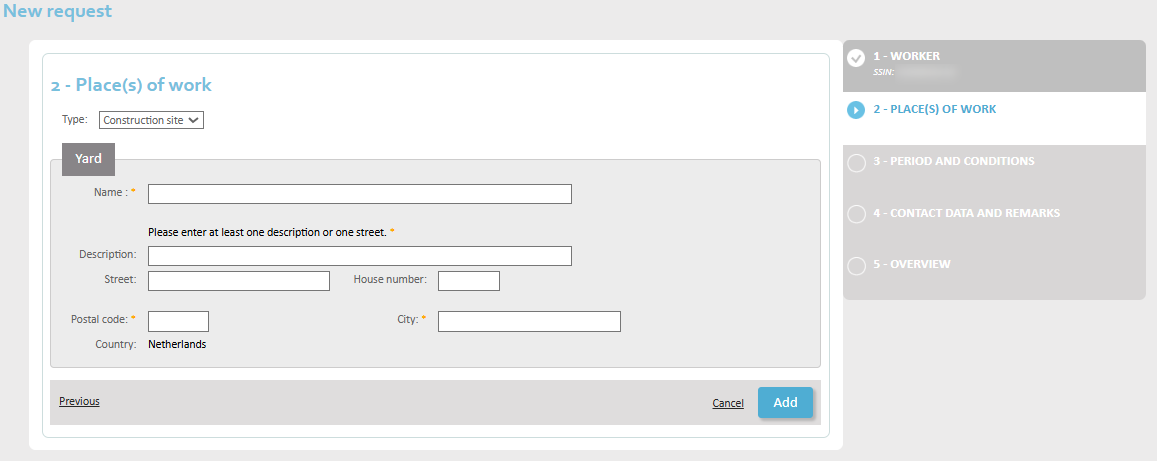
Complete the data:
- Name
- Description / Street : you must enter either a description or a street to pinpoint the location of the construction site.
- House number
- Postal code
- City
Now click on Add to add this place of work.
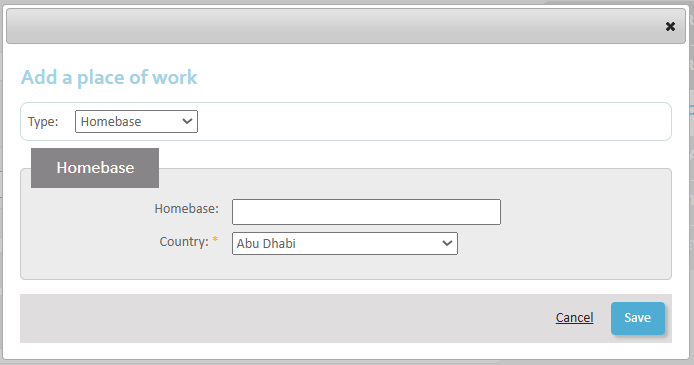
Type: Homebase (aviation)
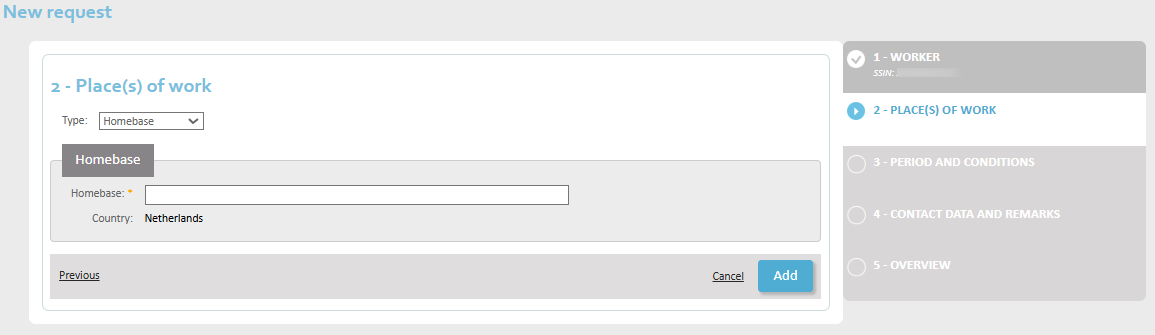
Enter the name of the homebase.
Now click on Add to add this place of work.
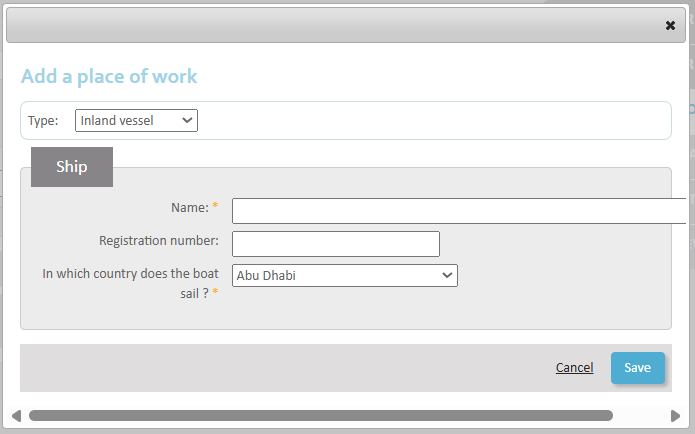
Type: Inland vessel (river shipping)

Complete the data:
- Name of the boat
- Registration number of the boat
- Harbour or river
Now click on Add to add this place of work.
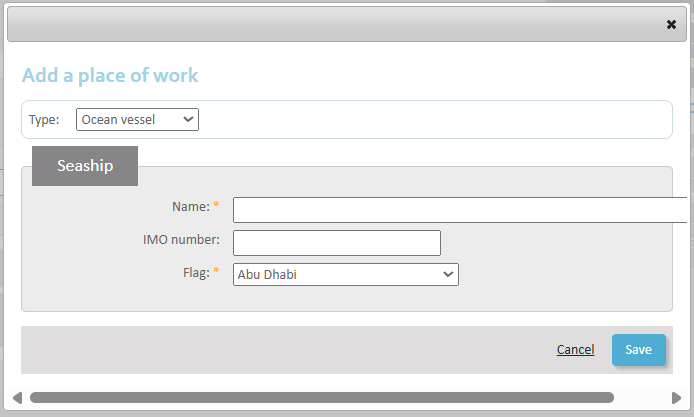
Type: Ocean vessel (maritime navigation)
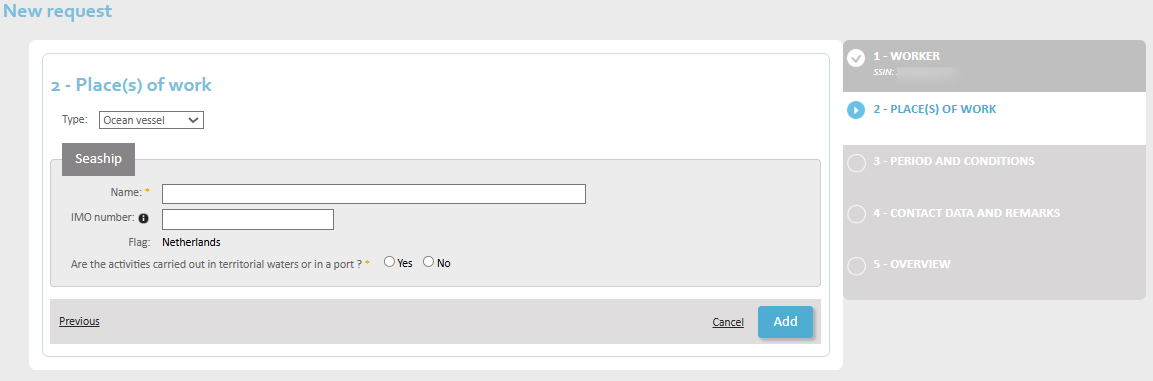
Complete the data:
- Name
- IMO number: the IMO number is a unique identification number assigned to the construction of a vessel with a gross tonnage of 100 tons or more. It consists of 7 digits.
- Are the activities being carried out in territorial waters or in a port? Choose Yes or No.
Now click on Add to add this place of work.
Adding more than one place of employment
You can add another place of employment by clicking ‘Add place of work’.

When all places of employment have been detailed, move on to the next screen by clicking ‘Nextt’.
Documenting the period and work conditions
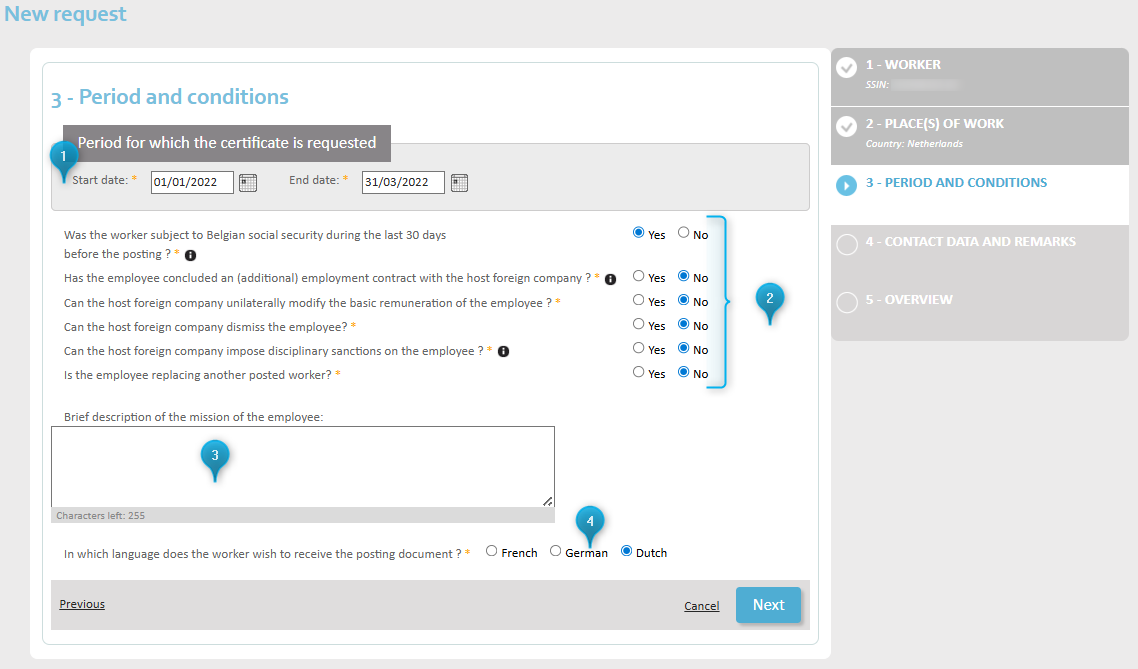
- Enter the start date and end date of the posting.
- Answer the questions with Yes or No :
- Has the employee been covered by Belgian social security in the 30 days preceding the posting? (Examples of people covered by the Belgian scheme: recipient of unemployment benefit, salaried worker employed by another employer, student, pensioner.)
- Has the employee entered into an (additional) employment contract with the host company abroad? (This is a real employment contract and not a document containing, for example, the practical terms of the mission.)
- Can the host company abroad unilaterally modify the employee’s base remuneration?
- Can the host company abroad dismiss the employee?
- Can the host company abroad take disciplinary measures against the employee? (Denying access to the workplace is not considered a disciplinary sanction in the context of this issue.)
- Will the employee you are posting be replacing another employee who was posted?
- Optional: give a short description of the employee’s mission.
- Indicate whether the employee wishes to receive the posting certificate in French, German or Dutch. You can choose only one.
When you have completed this screen, move to the next one by clicking ‘Next’.
Contact details and extra information
On this screen, you will enter the contact details of a person who can answer any questions the NSSO may have about the posting request.
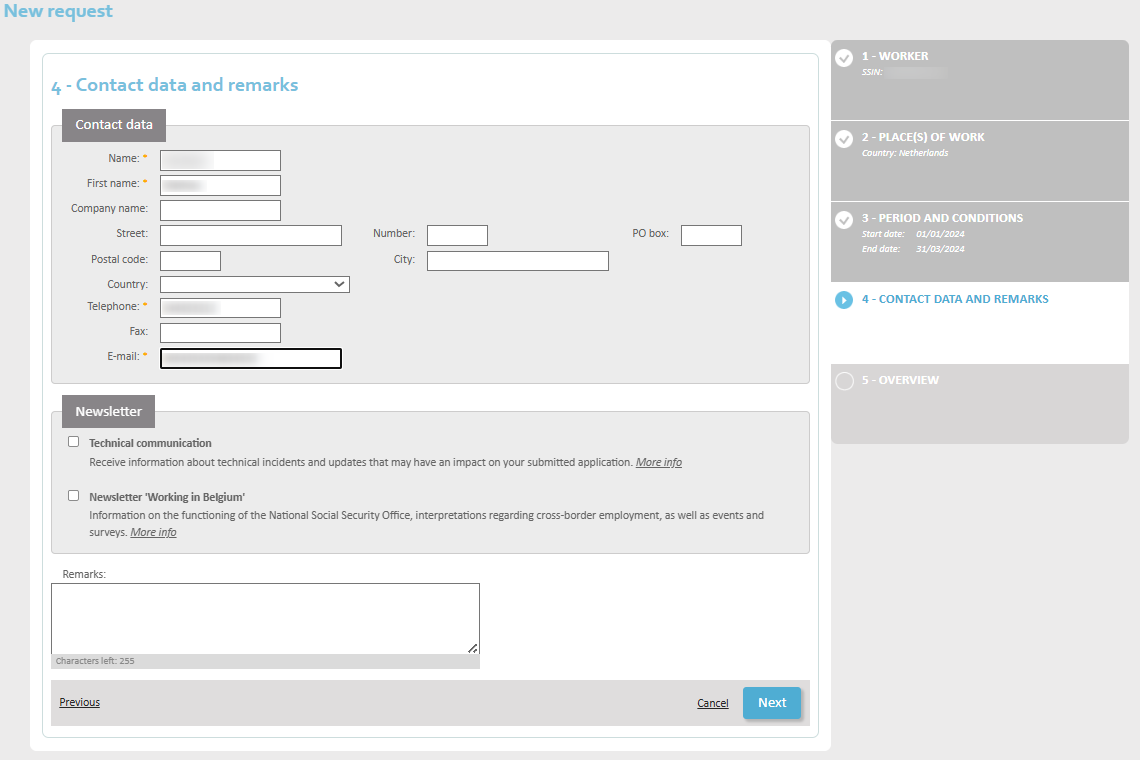
Please complete the form with:
- Name
- First name
- Company name
- Street
- Number
- PO box
- Postal code
- City
- Country
- Telephone
- Fax
In the ‘Remarks’ field, you may add any additional information to help the NSSO agent reach their decision.
When you are ready, click Next.
Summary
You have now completed the posting request and will be shown an overview of all the data you have just entered into the system. It is important to check them well before clicking Save at the bottom of the screen and effectively sending the request to the NSSO.
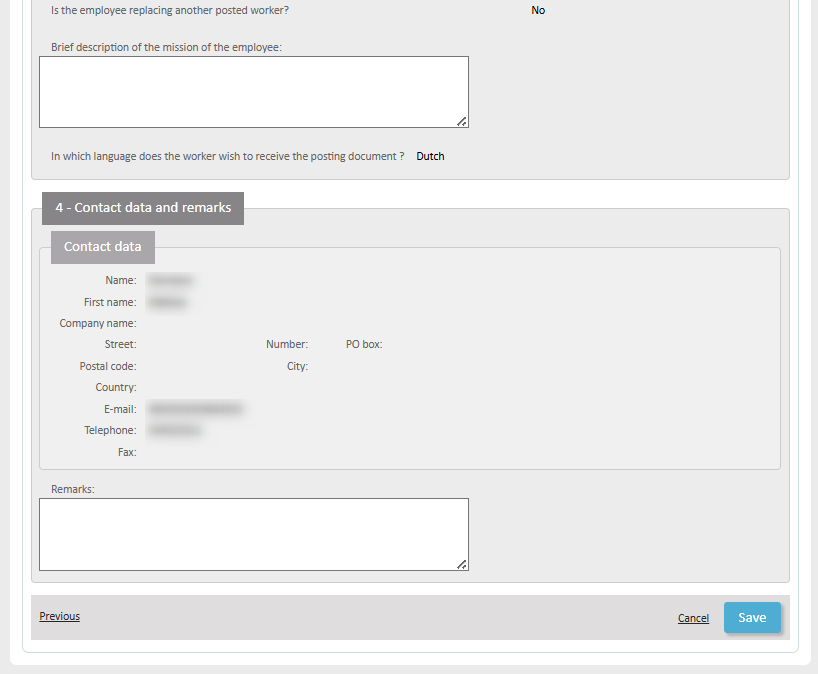
Click Save to:
- Register your posting request in the database
- Send the request to the NSSO for validation
- Get a unique transaction number
Confirmation of receipt
You will now get a confirmation that your request has been well and truly entered into the system.
The confirmation screen shows you:
- Your unique transaction number. This allows you to identify your document with accuracy, should the need arise.
- The details of the employee who will be posted abroad.
- Options for new requests reusing some of the data you have just entered:
- Request a posting for a different employee – with the same destination, period and work conditions. Steps 2 to 4 will be pre-filled, with a possibility to modify them.
- Request a posting for the same employee – with a different destination and different period, but with the same work conditions as before. Steps 1 and 4 will be pre-filled, step 3 partially pre-filled.
- Request a posting for the same employee, with the same destination and work conditions, but for another period. You only need to complete the dates in step 3.
Request a posting in multiple countries simultaneously under the ‘Simultaneous occupation request’ tab.
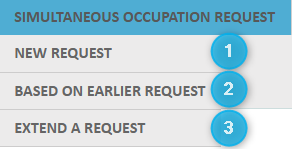
You can 1) start a request from scratch (New request), or 2) base your request on an existing one (Based on earlier request) to reuse existing data, or 3) extend an existing request (Extend a request).
In this manual, we will show you how to make a request from scratch.
Selecting the employee
Please note: you may only request a posting for a person who is in your employ during the entirety of the period you are requesting. The requested period of employment abroad must be covered by a Dimona declaration.
You can look up your employee based on their Social Security Identification Number (SSIN) or on their name in the personnel database of your organisation.
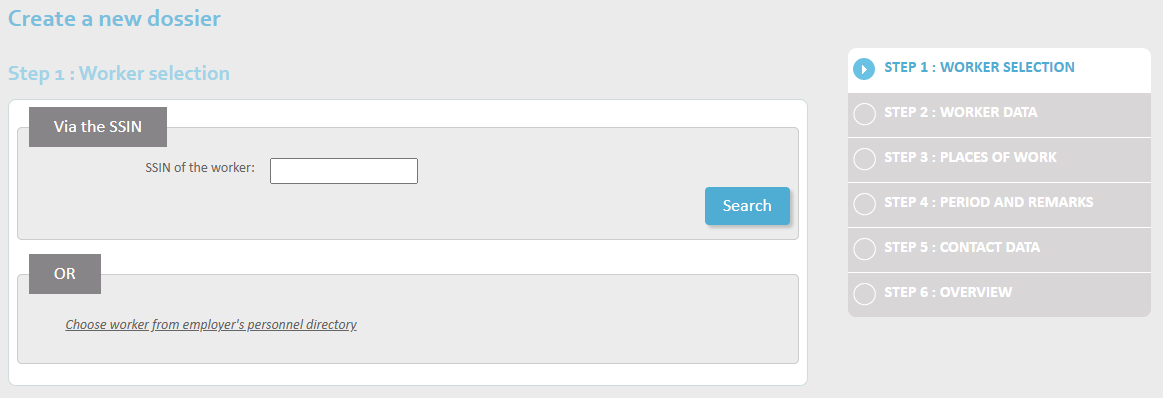
Enter the SSIN en click Search to look up the employee by number.
Alternatively, click on ‘Choose worker from employer’s personnel directory’ to conduct a search by name in the personnel database.
Employee data
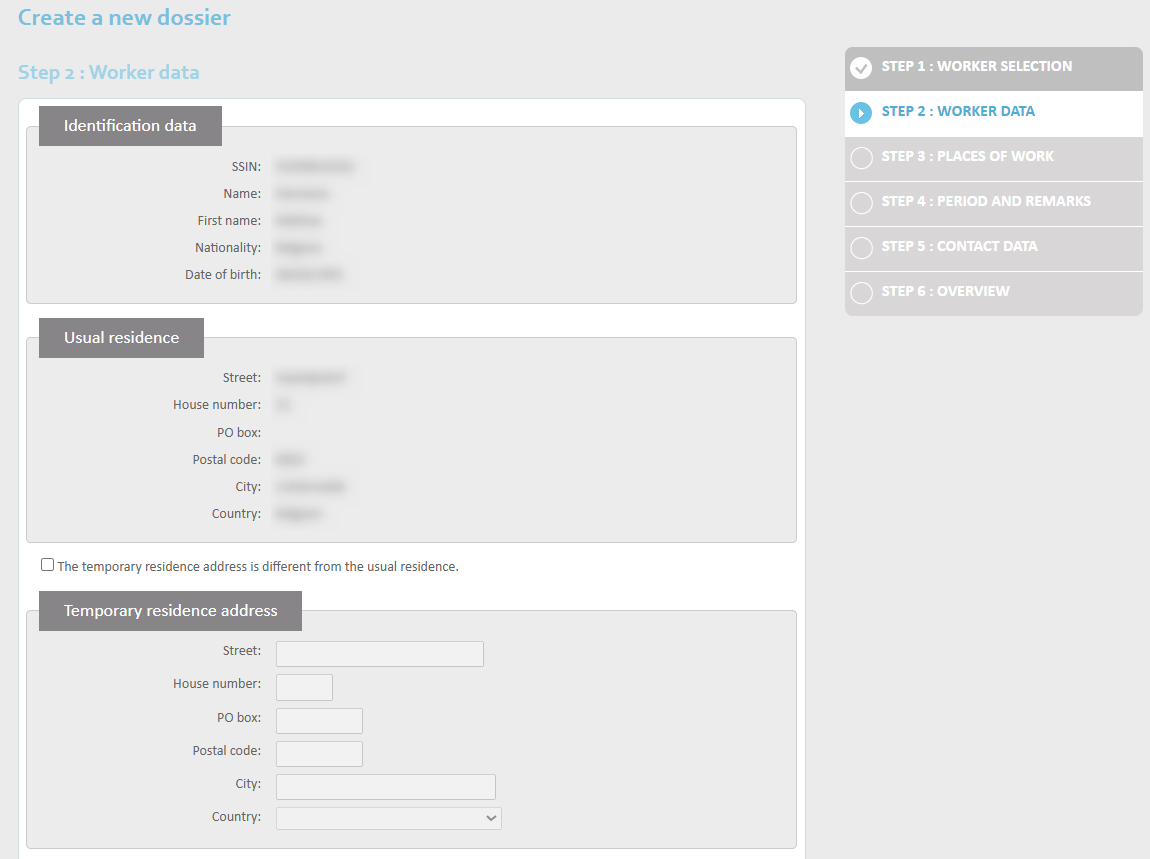
If the employee has a temporary address that differs from their home address, check the box ‘The temporary residence address is different from the usual residence’ and enter the temporary address under ‘Temporary residence address’. Enter the following data:
- Street
- Number
- PO box
- Postal code
- City
- Country
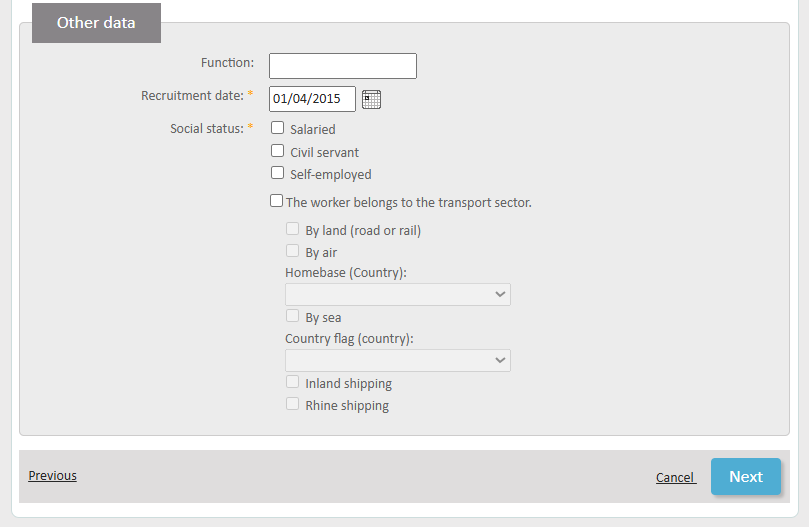
Under Other Data, select the date the employee entered your service (Recruitment date).
It is important to indicate the worker classification of the person you are posting:
- Salaried
- Civil servant or equivalent
- Self-employed
- Worker belongs to a transport company:
- Road haulage or railway transport
- Air transport: Homebase (country)
- By sea: flag of the vessel (country)
- Inland shipping
- Rhine shipping
Based on the options you check here, the data you will be asked to complete further on will be different.
When you have identified the employee for whom you are requesting the posting, click Next.
Determining the places of employment
You will now choose the countries where your employee is going to be working. Since this is a request for employment in multiple countries simultaneously, you must choose at least two. If one of those countries is Belgium, check the box ‘L’employé travaille aussi en Belgique’. In the next step, you will then be asked to supply the data for a place of employment in Belgium.
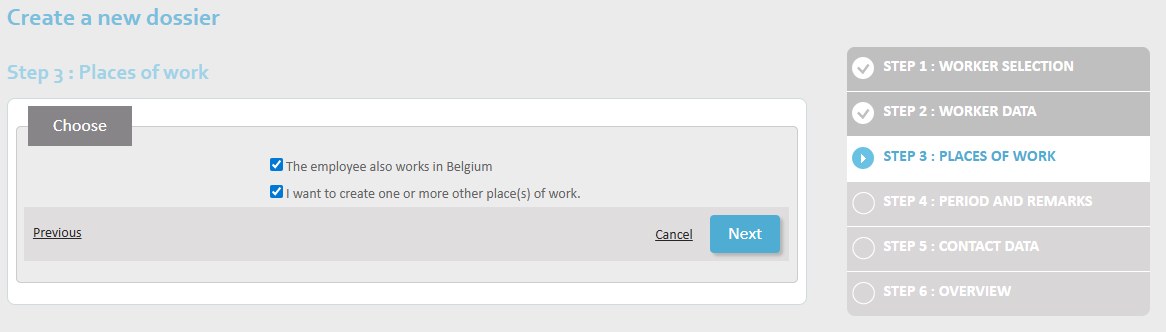
Click Next.
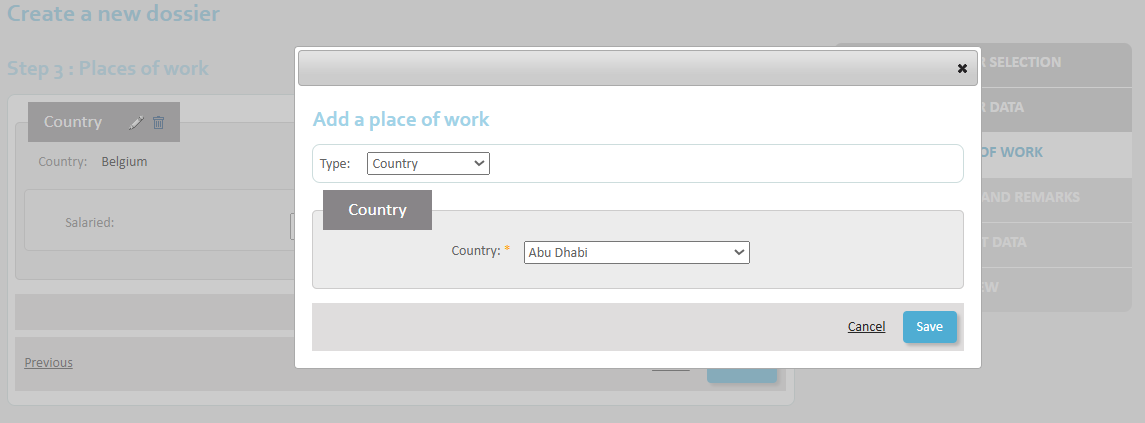
Choose the location type:
- Country – if there is no fixed address in the other country
- Company
- Construction site
- Homebase – for aviation
- Inland vessel – for river shipping
- Ocean vessel – for maritime shipping
Type: Country
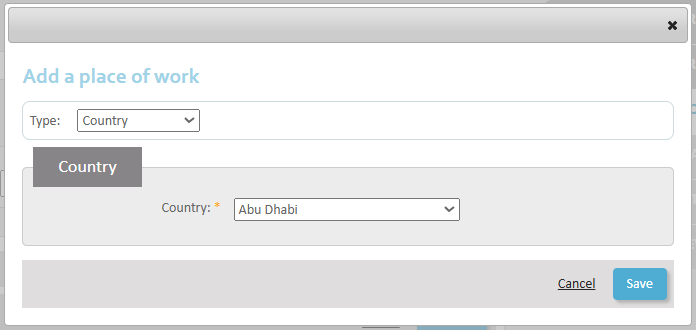
Enter the country and click Save .
Type: Company
Complete the data:
- Company name
- Identification number
- Street
- Number
- PO box
- Postal code
- City
- Country
Click Save.
Type: Construction site
Complete the data:
- Name
- Description
- Street
- Number
- PO box
- City
- Country
Click Save.
Type: Homebase (aviation)
Complete the data:
- Homebase
- Country
Click Save.
Type: Inland vessel (river shipping)
Complete the data:
- Name
- Registration number
- In which country does the boat operate?
Click Save.
Type: Ocean vessel (maritime navigation)
Complete the data:
- Name
- IMO number: the IMO number is a unique identification number assigned to the construction of a vessel with a gross tonnage of 100 tons or more. It consists of 7 digits.
- Flag
Now click on Save.
Adding the time percentage
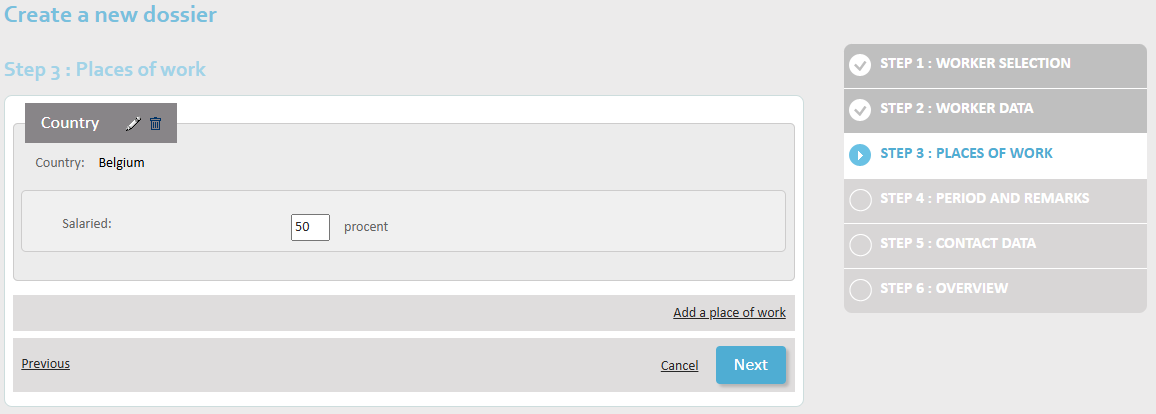
Indicate the percentage of time the employee will be working in each place of work.
Further actions: adding/removing/editing places
At any given time, you can:
- Remove a place of employment using the bin icon
- Edit a place of employment using the pencil icon

Click on Add a place of employment to add more places.
When you have added all places of employment, click Next.
Documenting the period and work conditions
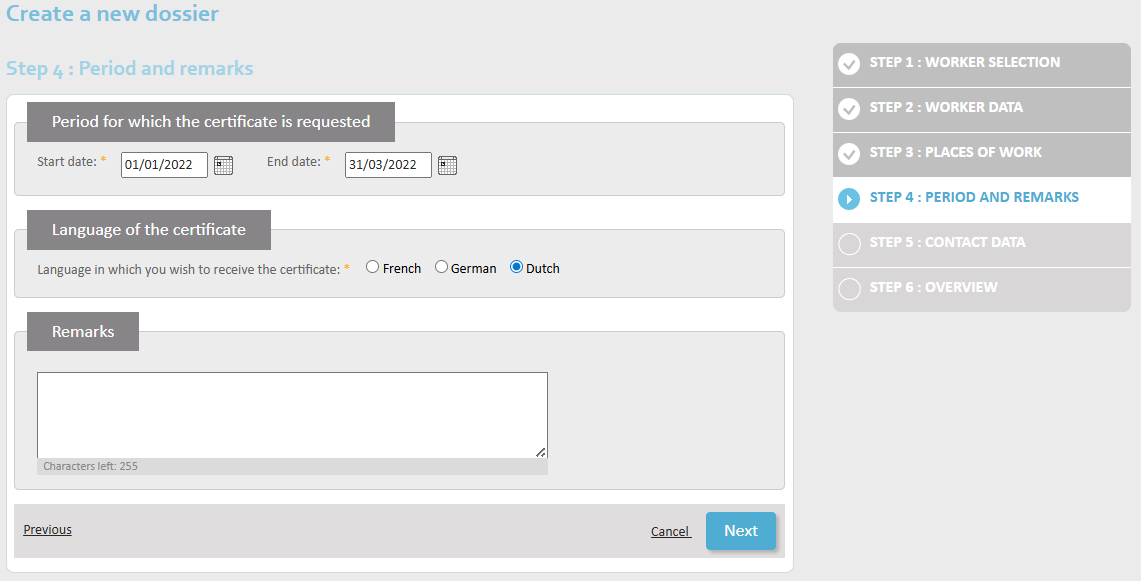
- Enter the start date and end date of the posting.
- Indicate whether the employee wishes to receive the posting certificate in French, German or Dutch. You can choose only one.
- Optional: add any extra information that you consider useful under ‘Remarks’.
When you have completed this screen, move to the next one by clicking ‘Next’.
Contact details
On this screen, you will enter the contact details of a person who can answer any questions the NSSO may have about the posting request.
Please complete the form with:
- Name
- First name
- Social Security Identification Number (SSIN)
- Employer
- Function
- Street – House number – PO box
- Postal code – City
- Country
- Telephone
- Fax
When you are ready, click Next.
Summary
You have now completed the posting request and will be shown an overview of all the data you have just entered into the system. It is important to check them well before clicking Save (Sauvegarder) at the bottom of the screen and effectively sending the request to the NSSO.

Click Save to:
- Register your posting request in the database
- Send the request to the NSSO for validation
- Get a unique transaction number
Confirmation of receipt
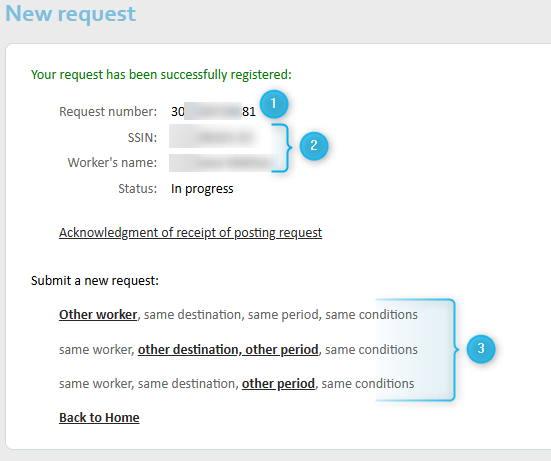
You will now get a confirmation that your request has been well and truly entered into the system.
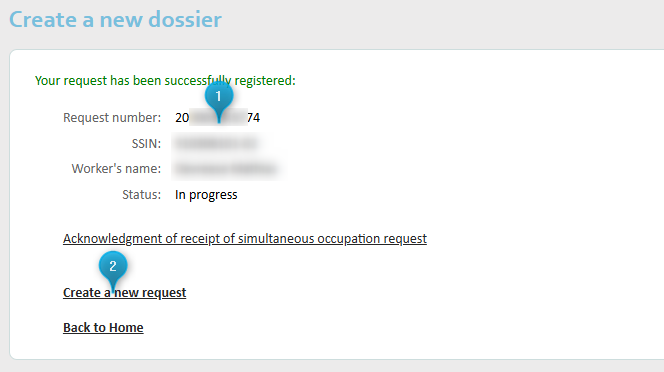
The confirmation screen shows you:
- Your unique transaction number. This allows you to identify your document with accuracy, should the need arise. Underneath this number is the status of your request.
- A return to the home screen of the online service (Back to Home), or a link to open a new request (Create a new request).
If you choose to enter a new request at this point, you are offered three options, two of which allow you to reuse a selection of the data you have just entered:
- Identical request for a different employee – with the same destinations and the same period
- New request based on an existing one
- Blank new request
Request a voyage for a seafarer under the ‘Request seafarers’ tab.
These requests are very similar to classic posting request, so please consult chapter 2. How to request a posting to see how to complete one.
There is one notable difference between seafarer and other requests, and that is the place of employment (Lieu d’occupation). There, you will have to enter ship data:
- Flag
- IMO Number: the ship identification number.
Consult your existing requests under the ‘Consult a request’ tab.
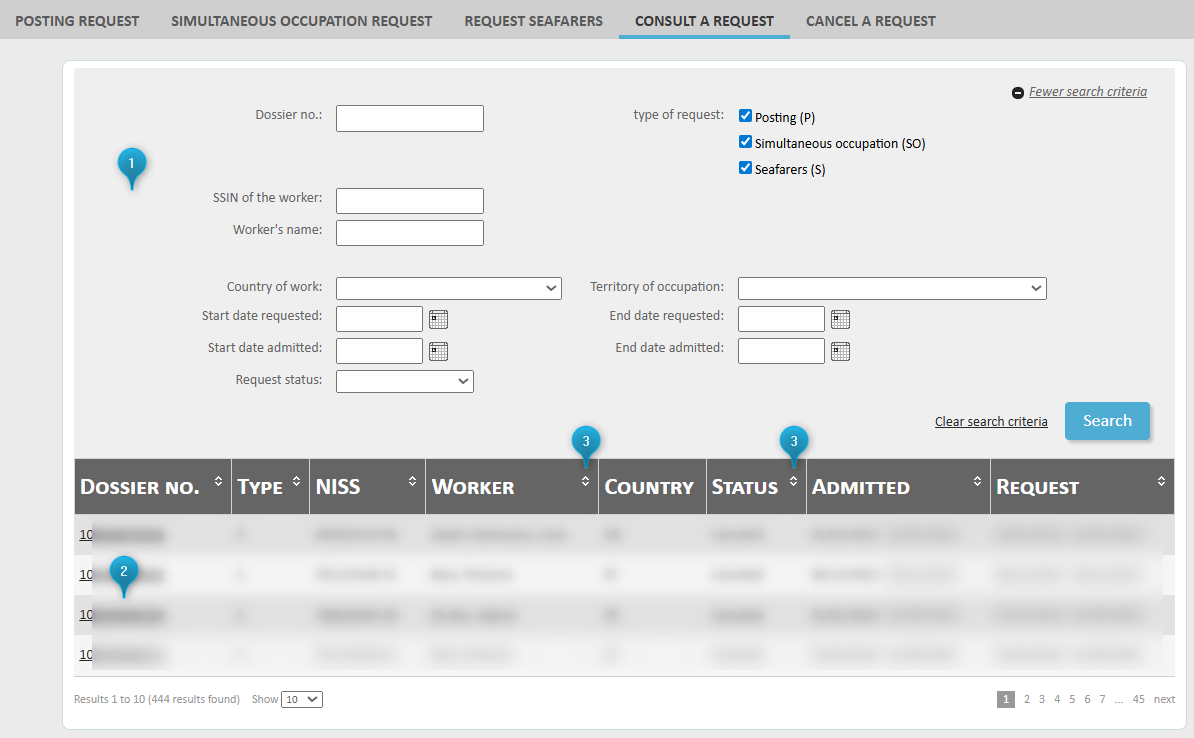
This screen consists of the following:
- Search fields to help you filter your requests
- The list of requests – by default, the ten most recent requests are listed
- Columns whose contents you can reorder:
- Transaction number
- Type
- Social Security Identification Number (NISS)
- Worker
- Country
- Status
- Admitted period (Admitted)
- Requested period (Request)
The search fields are the following:
- Dossier no.
- Type of the request:
- Posting
- Simultaneous occupation
- Seafarers
- Worker Social Security Identification Number (SSIN)
- Workers name
- Country where the employee will be working (Country of work)
- Territory of occupation – a place with specific legislation, notably:
- Alderney
- Guernsey
- Jersey
- Sark
- Isle of Man
- Québec
- Requested start date
- Requested end date
- Admitted start date
- Admitted end date
- Status of the request
Enter your search criteria and click Search to find matching results. To erase your search data and start over, click on Clear search criteria.
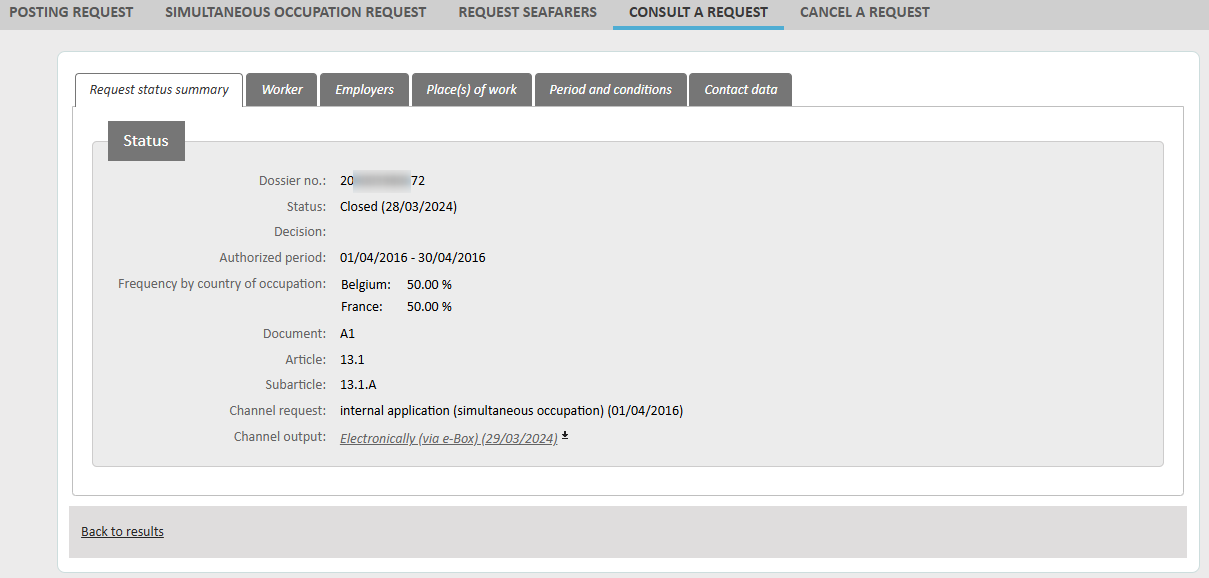
To see the details of a request, click on its transaction number. You will see a summary of the data you entered, as well as the status and the ‘output canal’ – whether it is a paper document sent through the mail, or a digital document sent to your e-Box Enterprise.
Possible statuses are:
- In progress
- Cancelled
- Closed
Your request may show the following NSSO decisions:
- Approved
- Rejected
Cancel a request under the ‘Cancel a request’ tab.
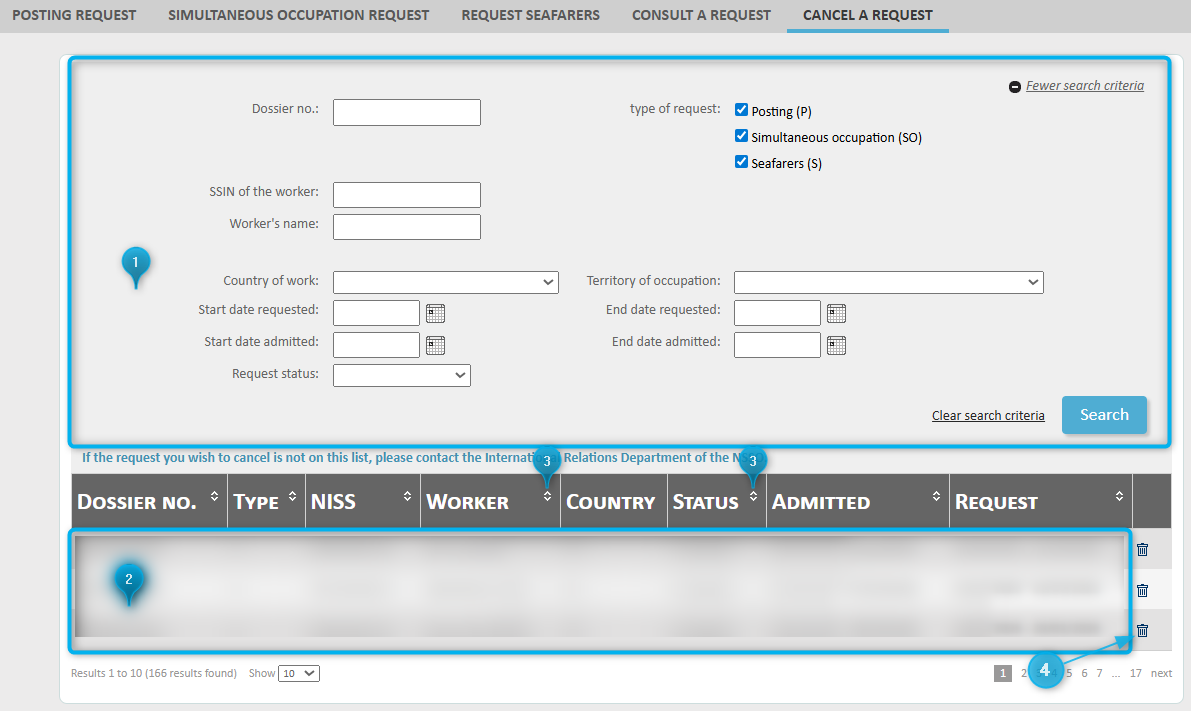
This screen consists of the following:
- Search fields to help you filter your requests
- The list of requests – by default, the ten most recent requests are listed
- Columns whose contents you can reorder:
- Dossier no.
- Type
- Social security number (NISS)
- Worker
- Country
- Status of the request (Status)
- Admitted period (Admitted)
- Requested period (Request)
- Bin icon for cancelling a request
The search fields are the following:
- Dossier no.
- Type of the request:
- Posting
- Simultaneous occupation
- Seafarers
- Worker Social Security Number (SSIN)
- Worker’s name
- Country where the employee will be working (Country of work)
- Territory of occupation – a place with specific legislation, notably:
- Alderney
- Guernsey
- Jersey
- Québec
- Sark
- Isle of Man
- Requested start date
- Requested end date
- Admitted start date
- Admitted end date
- Status of the request
Enter your search criteria and click Search to find matching results. To erase your search data and start over, click on Clear search criteria.
If you cannot see the request you want to cancel in the list, please contact the International Relations Department of the NSSO.
To cancel a request, click the bin icon next to it. You will see a summary of the data you entered. If you are sure you want to cancel, click the Cancel the request button.
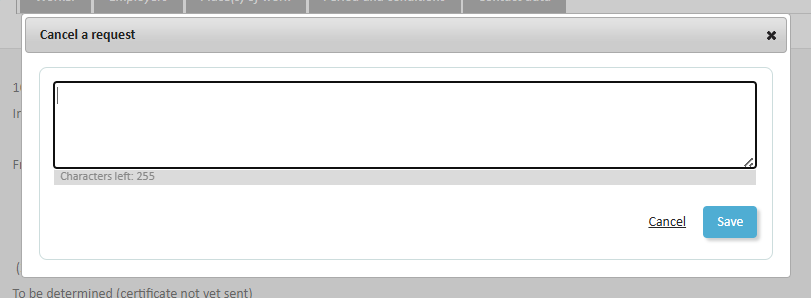
In order to cancel a request, you are required to offer a justification. Enter it in the field and click Save to cancel.
After that, the request will still be listed, but its status will be ‘Cancelled’.

Funded by the European Union – NextGenerationEU. Views and opinions expressed are however those of the author(s) only and do not necessarily reflect those of the European Union or European Commission. Neither the European Union nor the European Commission can be held responsible for them.
National Social Security Office (NSSO)
- Address: Place Victor Horta, 11 - 1060 Brussels
- Telephone: +32 (0)2 509 59 59
- Website: www.onss.be (in french)
You can also get in touch via our Contact page.


