Mahis - online service
What is Mahis?
An employer or a company without staff may mandate service providers to manage its workforce, complete declarations or carry out other administrative duties.
Mahis is the secured online service that allows employers and companies without staff to manage and consult mandates.
Employers and companies without staff have two roles in Mahis: either managing mandates (creating, consulting or closing mandates) or consulting mandates (‘consulting mandates’ only).
To use Mahis, you first need to register on the social security portal.
The Mahis application distinguishes between an NSSO employer and a company without staff.
Some application groups are only accessible to NSSO employers. You can create a company mandate with all the application groups, but some of these groups will only be activated once you have identified yourself as an employer.
Once you have successfully identified yourself, you will access the home page of the Mahis application using the ‘Mandates’ button (green box for managing mandates), the ‘Representatives’ button (pink box for the legal form of a company) and the ‘Identification’ button (yellow box for applying to register as a service provider).
Only authorised representatives in the Crossroads Bank for Enterprises (CBE) have the option of submitting an identification request to qualify as a service provider via the ‘Identification’ button.
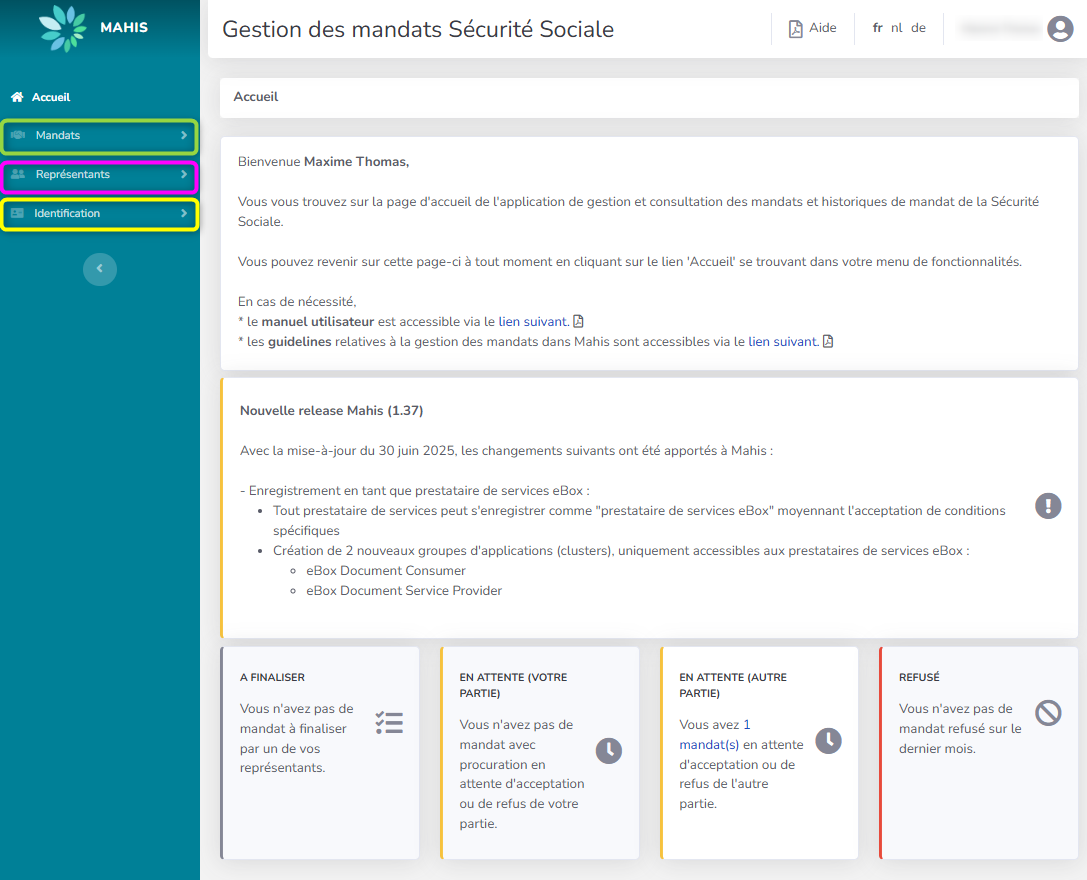
As a principal or mandatary, you can identify the status of your mandate in different blocks:
The steps are based on the number of mandates (thus, a mandate for two groups will give one count in these blocks):
- ‘To be finalised’ (‘A finalizer”) and ‘Pending’ (‘En attente”) blocks are grey if mandates are in this status, otherwise they are white.
- The ‘Rejected’ (‘Refusé’) block turns red if there are mandates in this status, otherwise it is white.
- If there are mandates in the block in question, there is a hypertext link to the number of mandates
(x mandates) to redirect the user to the corresponding mandates.- If there is only one mandate, the user is taken directly to the action screen. For refusals, the consultation is taken into account.
- If there are several mandates, the user is redirected to the list of corresponding mandates
The creation of a mandate involves several steps:
- Data introduction
- Validation of a mandate
- Summary
The creation of a mandate is subject to a number of rules:
- Uniqueness requirement: This only applies to the group of single mandatary applications. In this case, at any time, a principal can only have one active mandatary for a given group of applications.
- Mandate period vs Principal and mandatary activity period: Any action on a mandate involves checking the mandate period against the activity period of the principal and mandatary. As a general rule, the entities must be active and the period of the mandate must be within the activity period of the entities.
- Any action on a mandate involves sending a notification to the principal and the mandatary.
- All mandataries receive notifications in their e-Box Entreprise.
- Principals receive notifications via e-Box if they have an account in the social security User Management, otherwise by post.
- A new version of the authorisation can be attached to any action taken on a mandate by a mandate manager.
Under ‘Mandates” (‘Mandats’) in the menu on the left, click on ‘Create’ (‘Créer’). You’ll be taken to the ‘Introducing data’ page.
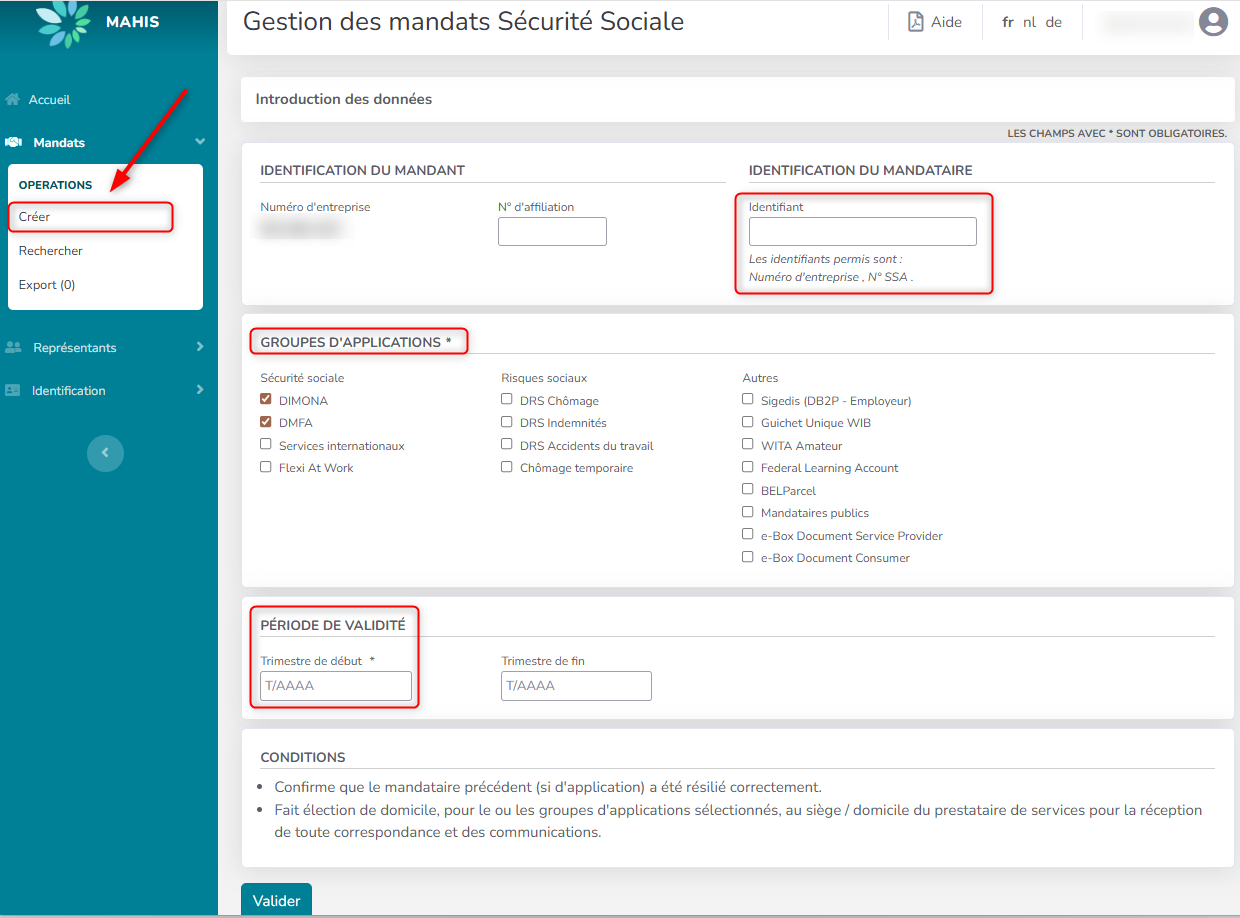
In this screen, you enter the information required to create the mandate.
- Please enter the company number of the service provider or the SSA number of the social secretary in the ‘Mandatary Identification’ field (‘Identification du Mandataire’).
- Please select the application(s) for which you wish to create the mandate in the ‘Application Groups’ field (‘Groupes d’Applications’). In this example, the ‘Dimona’ and ‘DMFA’ groups have been selected.
- Please select the period for which you wish to start the mandate in the ‘Validity period’ field (‘Période de validité’).
- The term of the mandate may not begin later than one year in the future.
When you have completed the various fields, click on ‘Validate’ (‘Valider’).
The next step shows the ‘Validating a mandate’ page (‘Validation d’un mandate’).
This screen shows all the information previously entered. It is also at this stage that users will be able to validate their mandate, either by
- eID signature of the authorisation,
- Validation via authentication,
- a handwritten signature of the authorisation.
If the person is a legal representative of a company, he will be able to validate the mandate via authentication. Thus, he does not have to tick the box ‘I need an electronic version of the authorisation’ (‘Je désire une version électronique de la procuration’), but simply click on the ‘accept and sign’ button (‘accepter et signer’).
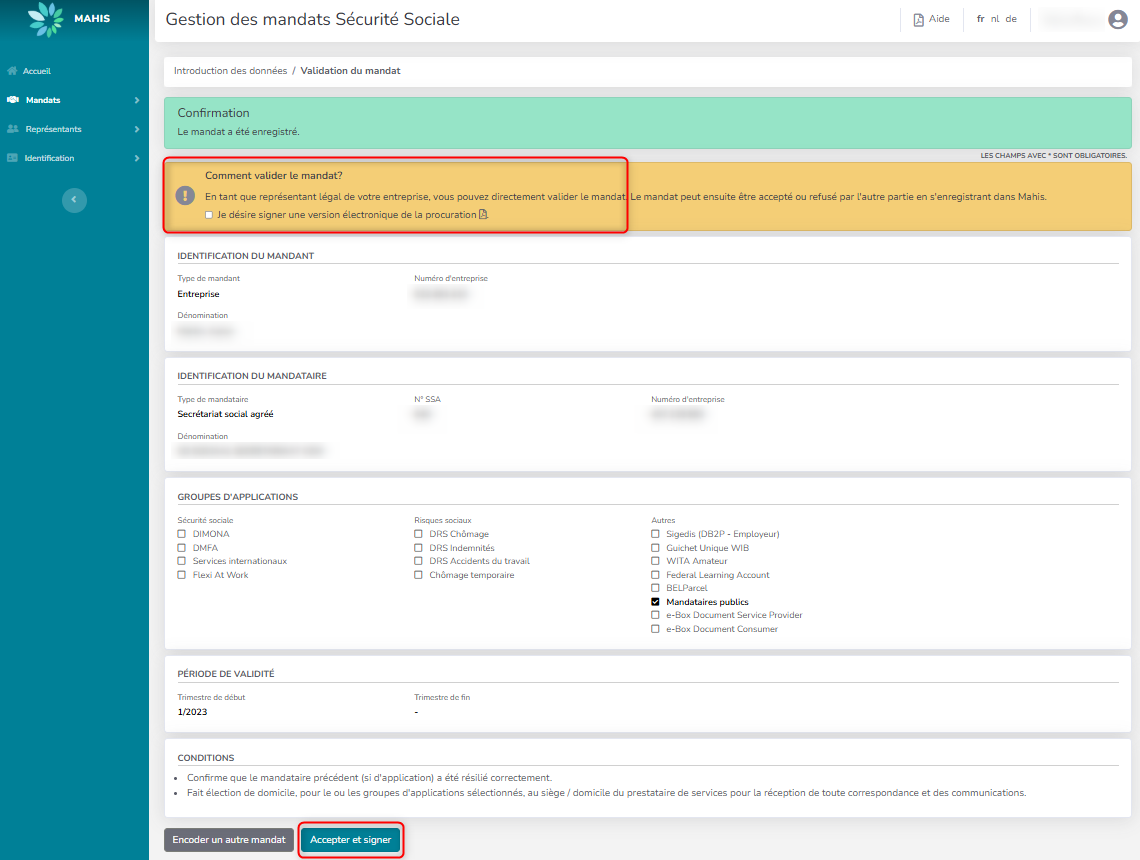
If the person is not a legal representative or if you wish to sign an authorisation manually or via eID, please tick the box ‘I would like an electronic version of the authorisation’ (red box) (‘Je désire une version électronique de la procuration’).
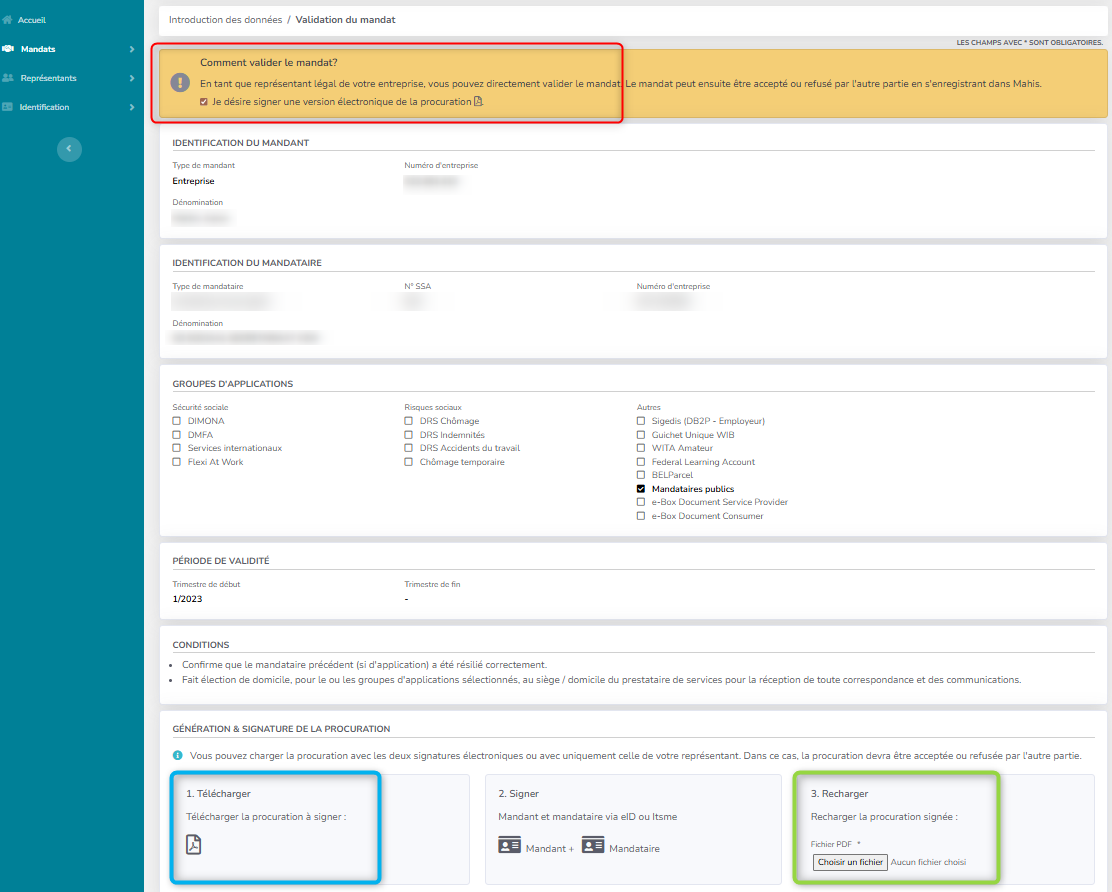
The system creates an electronic mandate that can be downloaded using the ‘PDF’ icon (blue box).
- The authorisation is created on the basis of a static Adobe template. This information is taken from various sources:
- Data from the principal and the mandatary: Identification and address plate. This data is taken from authentic sources on the basis of the information entered.
- The information entered, i.e. the application groups ticked and the start term.
- Data from the principal and the mandatary: Identification and address plate. This data is taken from authentic sources on the basis of the information entered.
- When the PDF is created, a timestamp is added by means of a certificate in order to save the creation date. This allows the user to check that the reloaded authorisation is indeed the one relating to the mandate currently being edited.
Following the validation of a mandate via authentication, it is possible to validate a mandate via different levels as long as the used level is higher or equal to the level already used by the first level. Thus, a mandate can be validated via authentication on the first level and via authentication or eID on the second level.
A handwritten authorisation must be signed by both parties and subsequently validated by an NSSO employee.
Once the authorisation has been signed by both parties either via the eID or by hand, it must be reloaded into the system (green box).
- For an authorisation signed via the eID, click on the ‘accept and sign’ button (‘accepter et signer”) to validate the mandate.
- For a handwritten authorisation, click on the ‘accept and sign’ (‘accepter et signer”) button to submit it to the National Social Security Office for approval
You arrive at the ‘Summary’ page (‘Récapitulatif’).
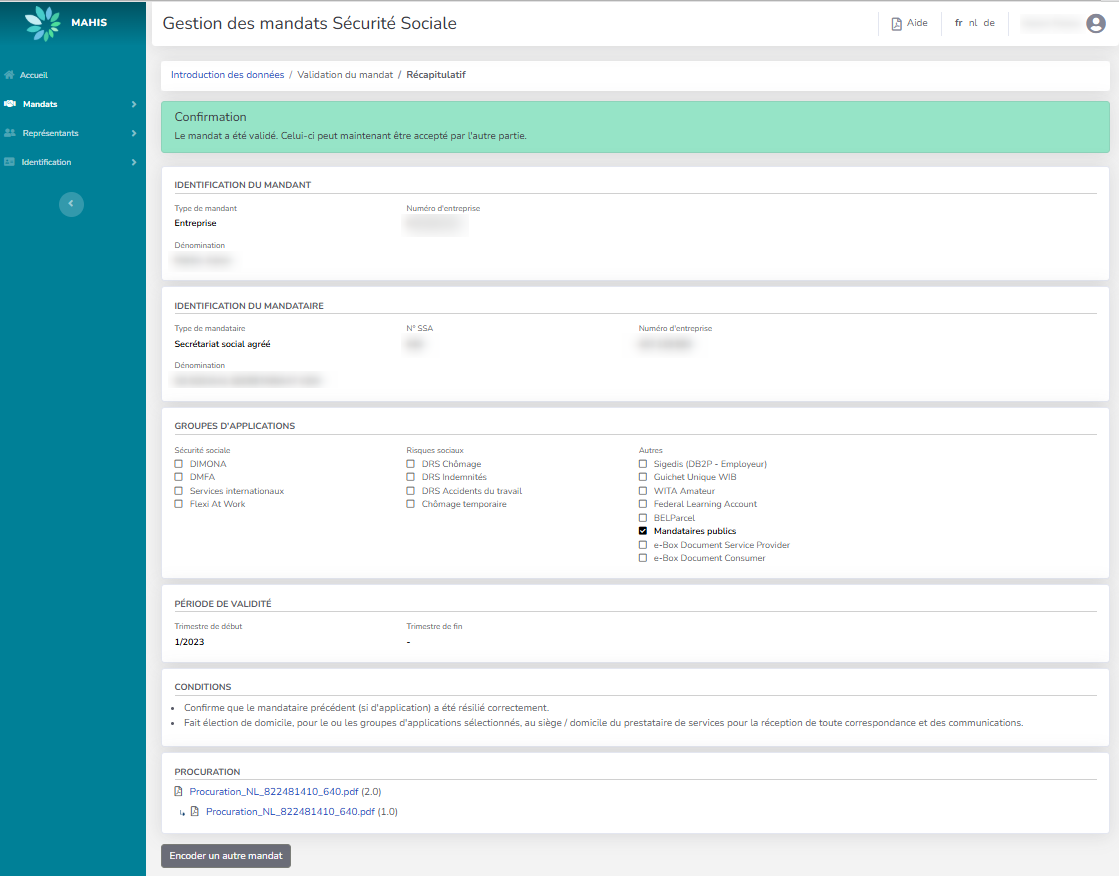
This page shows all the information entered to create the mandate. A banner at the top of the page confirms that the mandate has been registered.
The mandate must be validated by the NSSO (in the case of a handwritten authorisation), by eID signatures or by authentication before it becomes active.
Depending on the chosen procedure, the mandate is registered as follows:
- To be finalised: from creation (encoding a mandate) until the authorisation is loaded or the mandate is validated via authentication.
- Pending: If the authorisation is electronic and signed via eID, only by the head of the entity that encoded the mandate or if this same person has validated the mandate via authentication.
- To be validated: If the authorisation is a paper document (PDF scan with the manual signatures of the responsible persons) and requires validation by the NSSO.
- Activ: If the authorisation is electronic and signed by both parties via eID or if both parties have validated the authorisation via authentication or a combination of eID/authentication or if, in the case of a handwritten authorisation, it has been validated by the NSSO.
- Identification: If a company mandate is created via Wide (at least for Dimona) and via an electronic authorisation signed by both parties via eID.
Click on the banner ‘Mandate’ (‘Mandat’) and on the button ‘Search’ (‘Rechercher’).
This option allows you to see all the mandates held by the principal or the mandatary. You can search on the basis of applications, status of mandates, principals and mandataries.
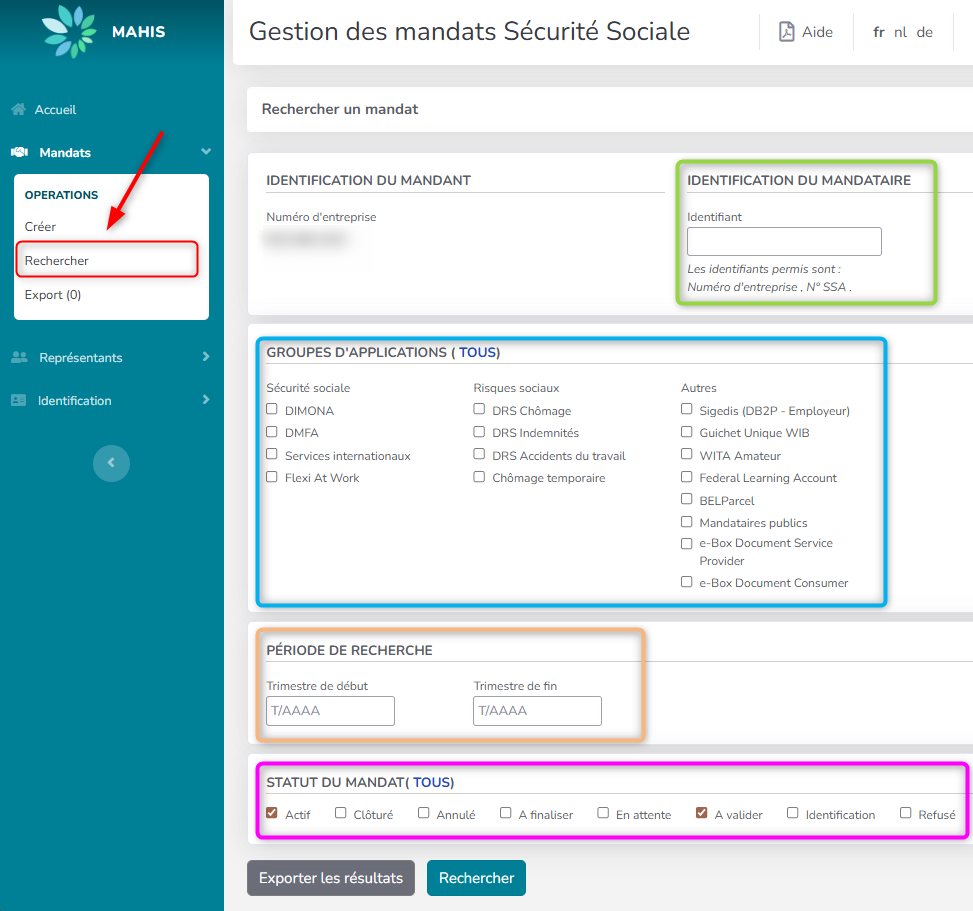
- To find a mandate with a specific mandatary, fill in the ‘Mandatary identification’ field (green box) (‘Identification du mandataire’) with the mandatary's company number.
- To select a specific application, tick the box next to the application in the ‘Applications Group’ (blue box) (‘Groupe d’Applications‘).
- To select a specific period for a mandate, enter a date in the ‘Search Period’ group (orange box) (‘Période de recherche ‘), specifying the number of the requested term and the year (e.g. 1/2022 for the 1st term of 2022).
- To select the status of the required mandate (active, closed, etc.), tick the box next to the status in the ‘Mandate status’ group (purple box) (‘Statut du mandat‘).
You can also combine several criteria in your search.
By default, if you do not fill in any fields, the search will return all the mandates that the employer has or has had. If the number of mandates is too large, you will need either to refine the search or request the mandates to be exported to an Excel file.
The results are displayed in the same way for all user types. By default, mandates are displayed according to their creation date in descending order (from newest to oldest). All columns can be sorted alphabetically, except for the reference number column, which is sorted by series of reference numbers.
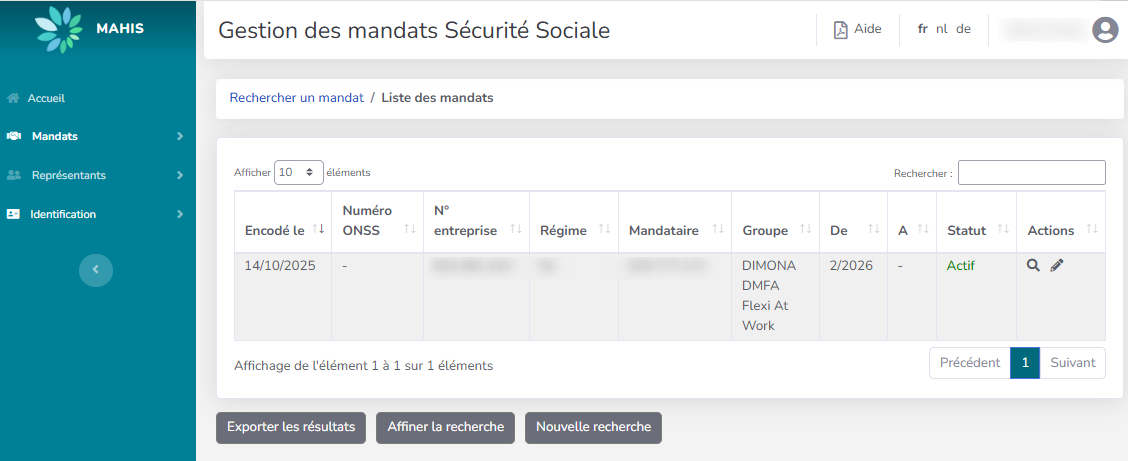
Picture 1: Result of a mandate search based on the 'active' status of the mandate.
Once the search result is displayed on the screen, you can consult a mandate by clicking on the following icon ![]() ( red box) under Actions.
( red box) under Actions.
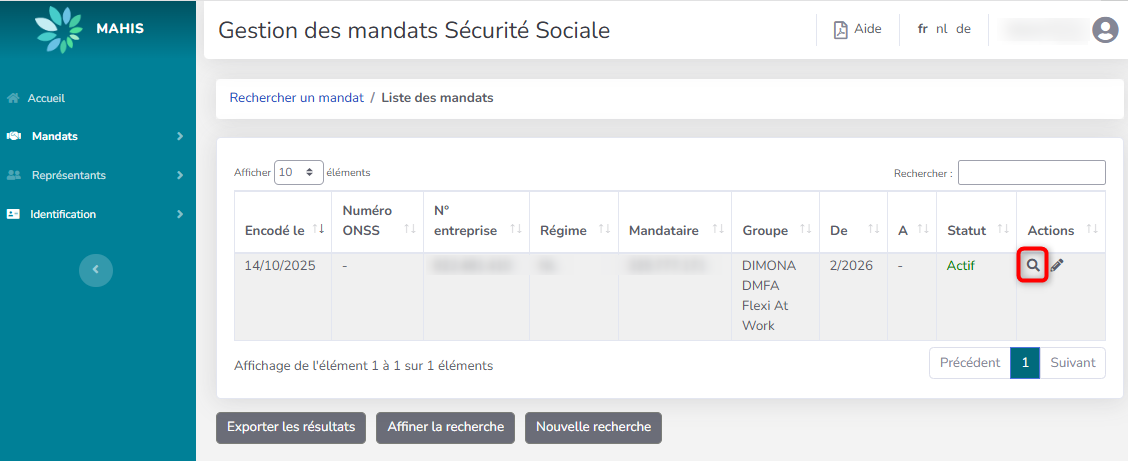
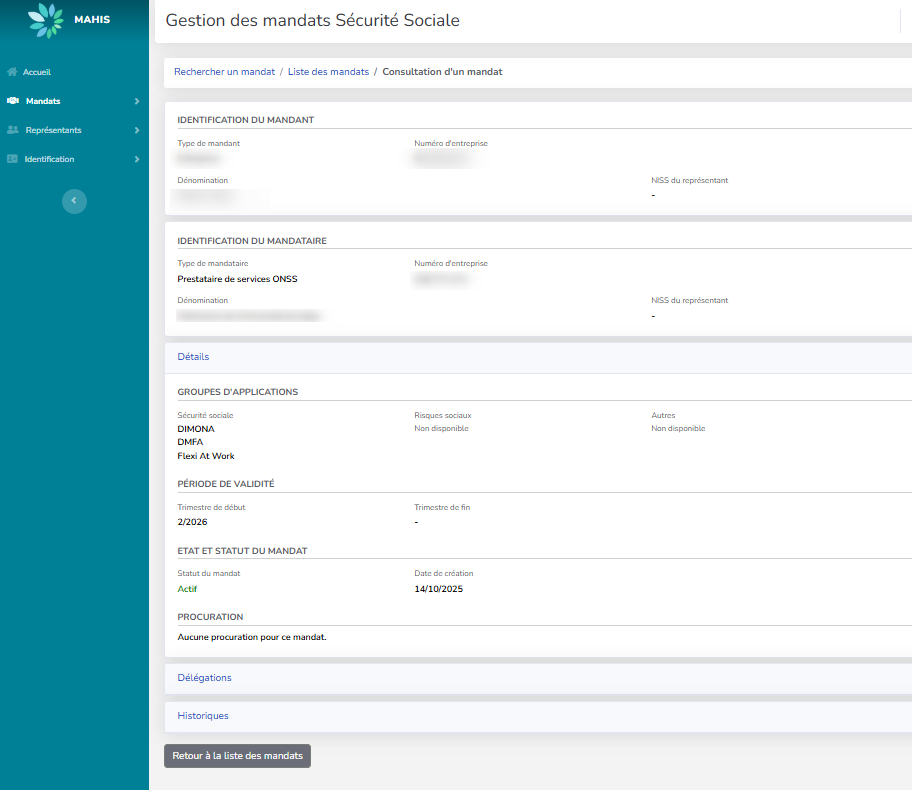
The icon![]() allows you to see all the information about a mandate, excluding the modification history.
allows you to see all the information about a mandate, excluding the modification history.
Once the result of the search is displayed on the screen, click on the following icon ![]() ( red box) to modify a mandate under Actions.
( red box) to modify a mandate under Actions.
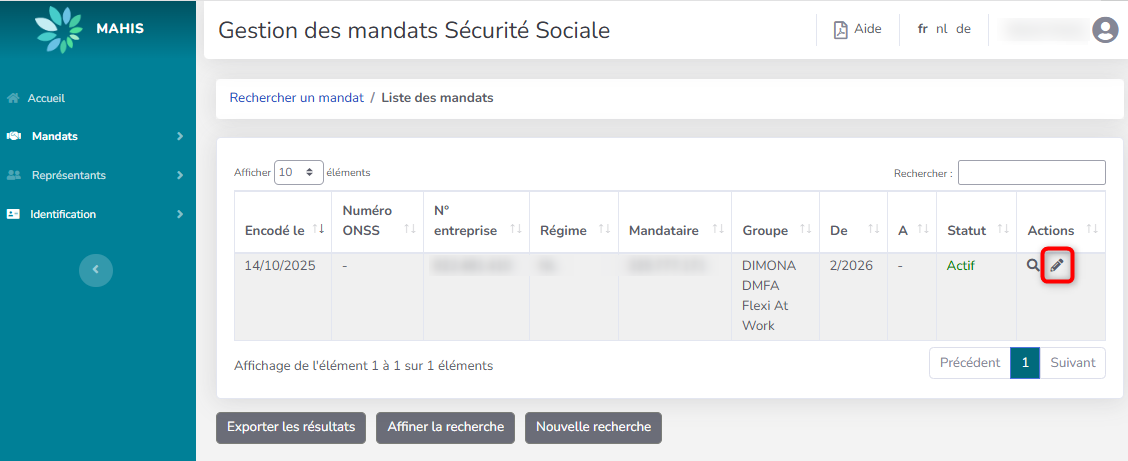
The icon ![]() only allows you to modify active mandates that do not have an end term (closure).
only allows you to modify active mandates that do not have an end term (closure).
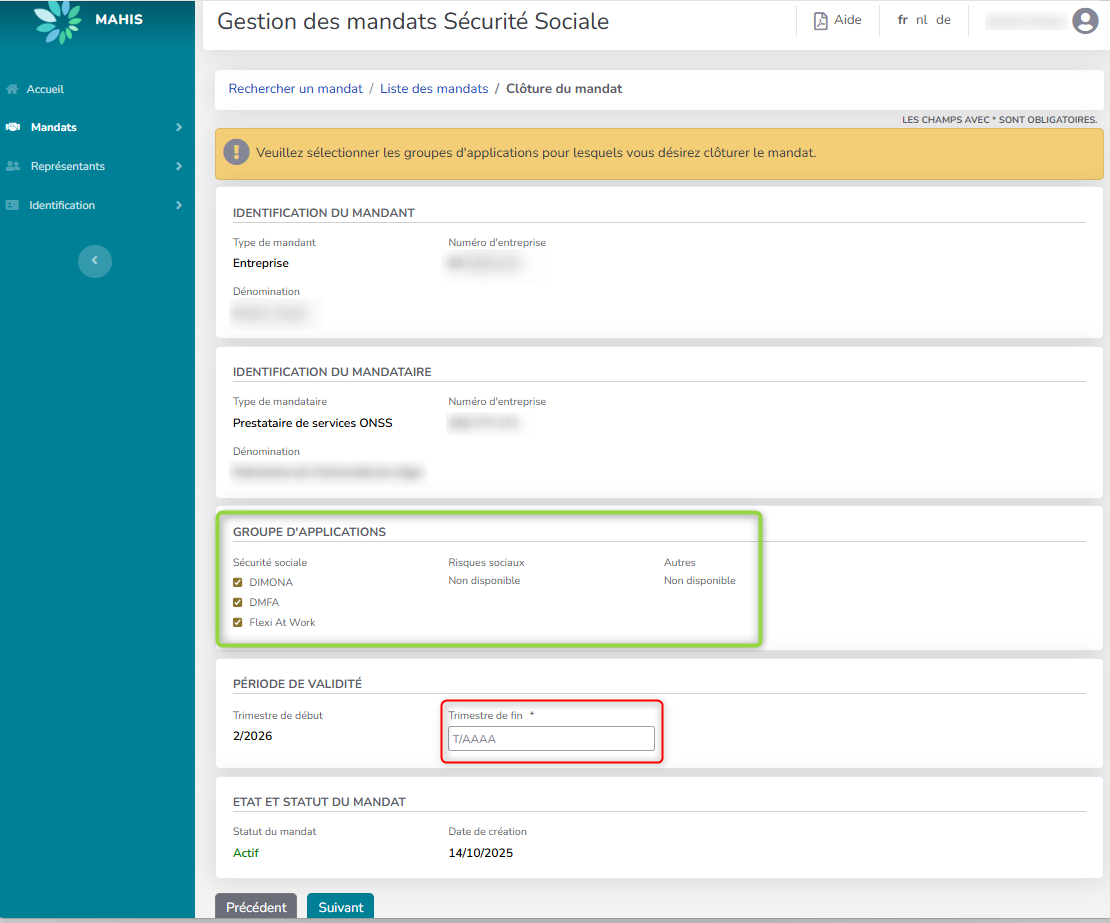
To close a mandate, you have to add an end term (red box) in the format term/year (e.g. for the 1st quarter 2022: 1/2022).
In the case of a mandate with several applications, select the mandate(s) you wish to modify by ticking the box next to the desired application (see green box) in the ‘Applications Group’ (‘Groupe d’Applications ‘).
To confirm the change, click on the ‘Next’ button (‘suivant’).
Not every person in a company can validate or close a mandate. To be able to do this, the person must have a function code specific to his company within Crossroads Bank for Enterprises. A function code represents the person's function within the company (manager, administrator, member of the board of directors, etc.). The authorised function codes are not identical. They differ according to the legal form of the company (Ltd, Public Limited Company, etc.).
To view the list of representatives, click on the ‘Representatives’ button (‘Représentants’) and on the ‘Representatives matrix’ button (‘Matrices des représentants’). This screen allows you to select the legal form of the company.
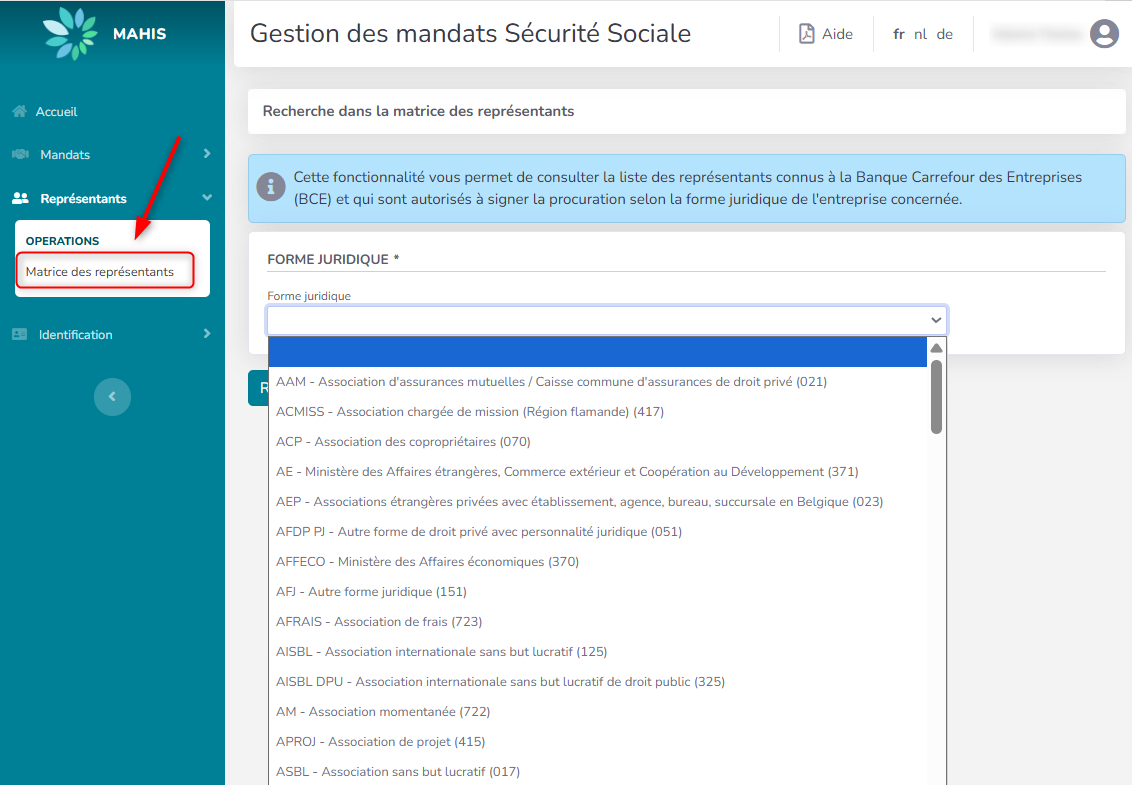
The search result for the chosen legal form is then displayed on the ‘Consult representatives matrix’ screen (‘Consulter la matrice des représentants’).

The list of representatives registered with the Crossroads Bank for Enterprises (CBE) who are authorised to sign the mandate is then displayed, depending on the legal form of the company previously selected.
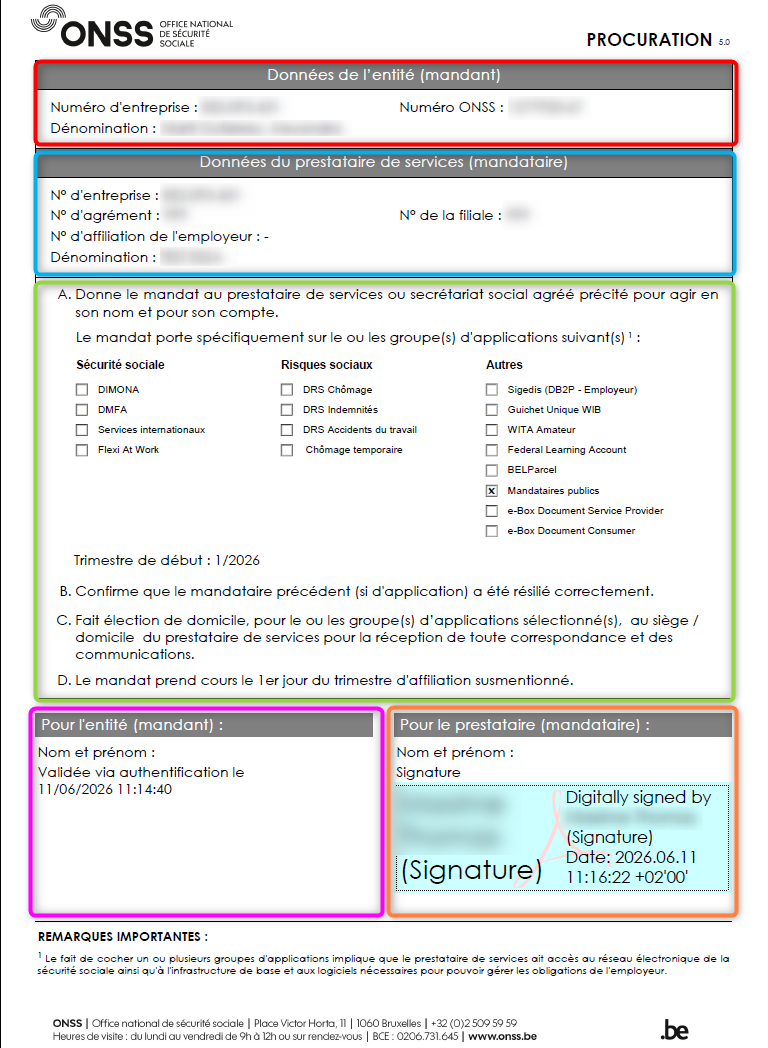
- Identification data of the principal (red box).
- Identification data of the mandatary (blue box).
- Application and period chosen for the mandate (green box)
- Principal's signature by authentication (pink box)
Mandatary's signature by eID signature (orange box)

Funded by the European Union – NextGenerationEU. Views and opinions expressed are however those of the author(s) only and do not necessarily reflect those of the European Union or European Commission. Neither the European Union nor the European Commission can be held responsible for them.
National Social Security Office (NSSO)
- Address: Place Victor Horta, 11 - 1060 Brussels
- Telephone: +32 (0)2 509 59 59
- Website: www.onss.be (in french)
You can also get in touch via our Contact page.


