Dimona (non-secured version) - online service
Before you start
What is Dimona?
Dimona (derived from ‘Déclaration Immédiate/Onmiddellijke Aangifte’, meaning ‘Immediate Declaration’) is an online service for employers to notify the NSSO (National Social Security Office) about every entry and leaving of an employee. This ‘Immediate Declaration’ is mandatory for all employers in the public and private sector.
When to use the non-secured version of Dimona?
There are 2 versions of Dimona, a secured and a non-secured version. As an employer, you should use the secured version of Dimona in first instance. Only if this is not possible, for example due to technical reasons or if you haven’t yet received a username and password, you can use the non-secured version as described in this manual.
How to connect to the non-secured version of Dimona?
On the Dimona page of the Social security enterprise portal (in French), click the button labelled Dimona: declare (‘Dimona: déclarer’ in French). It gives access to the non-secured version of the online service Dimona.
Types of Dimona declarations
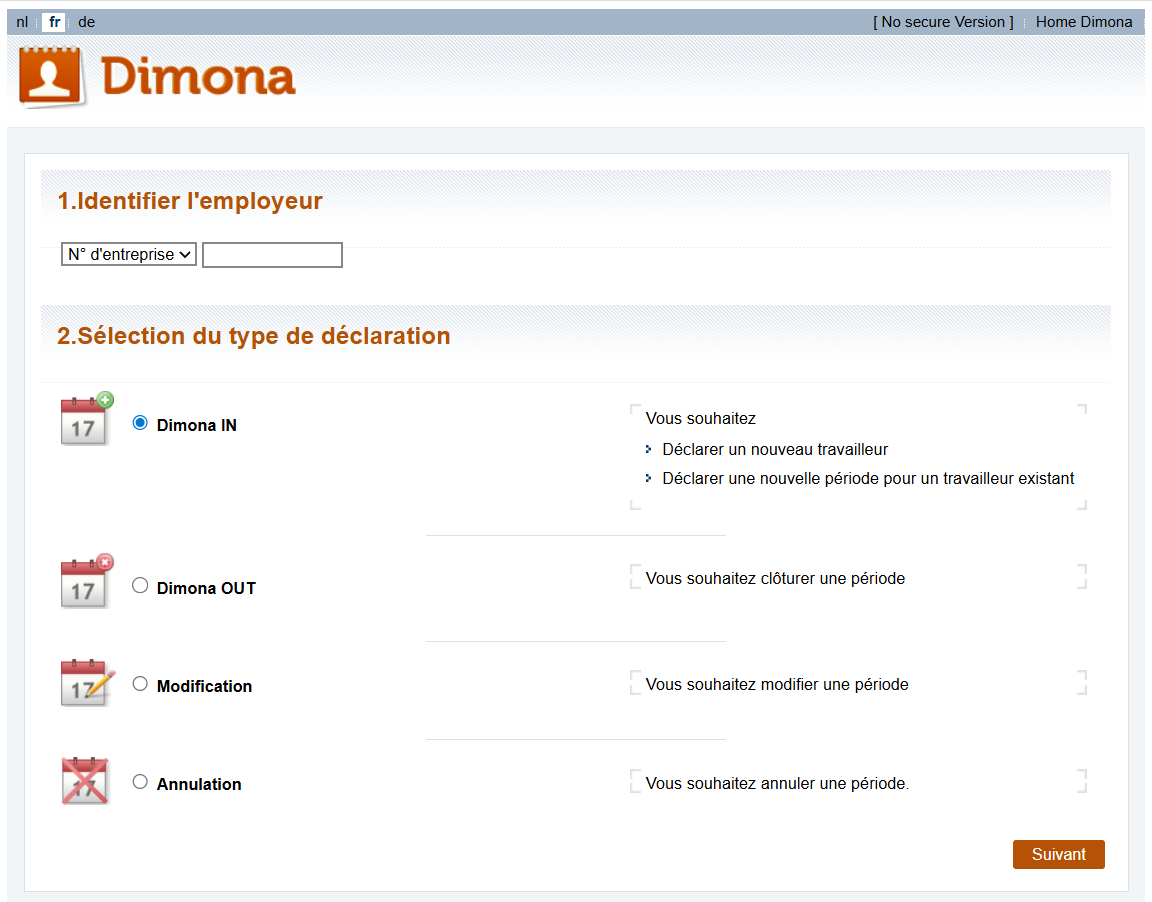
There are 4 types of declarations in Dimona:
- Dimona IN: use this to declare a new employee or to declare a new period of work for an existing employee;
- Dimona OUT: use this to report the end of a period of employment for an employee;
- Modification: use this to modify a period of employment for an employee;
- Cancellation (‘Annulation’ in French): use this to cancel a period of employment for an employee.
Use the declaration type Dimona IN if you want to declare a new contract or a new period for an existing employee. Following steps apply and are explained furtherly:
- Identify the employer.
- Select the type of declaration (Dimona IN).
- Confirmation of the employer’s identification.
- Identify the employee.
- Specify the working period.
- Enter start and ending of the working period.
- Check the overview of the declaration.
- Get a confirmation of receipt for the declaration.
Identify the employer (‘Identifier l’employeur’)
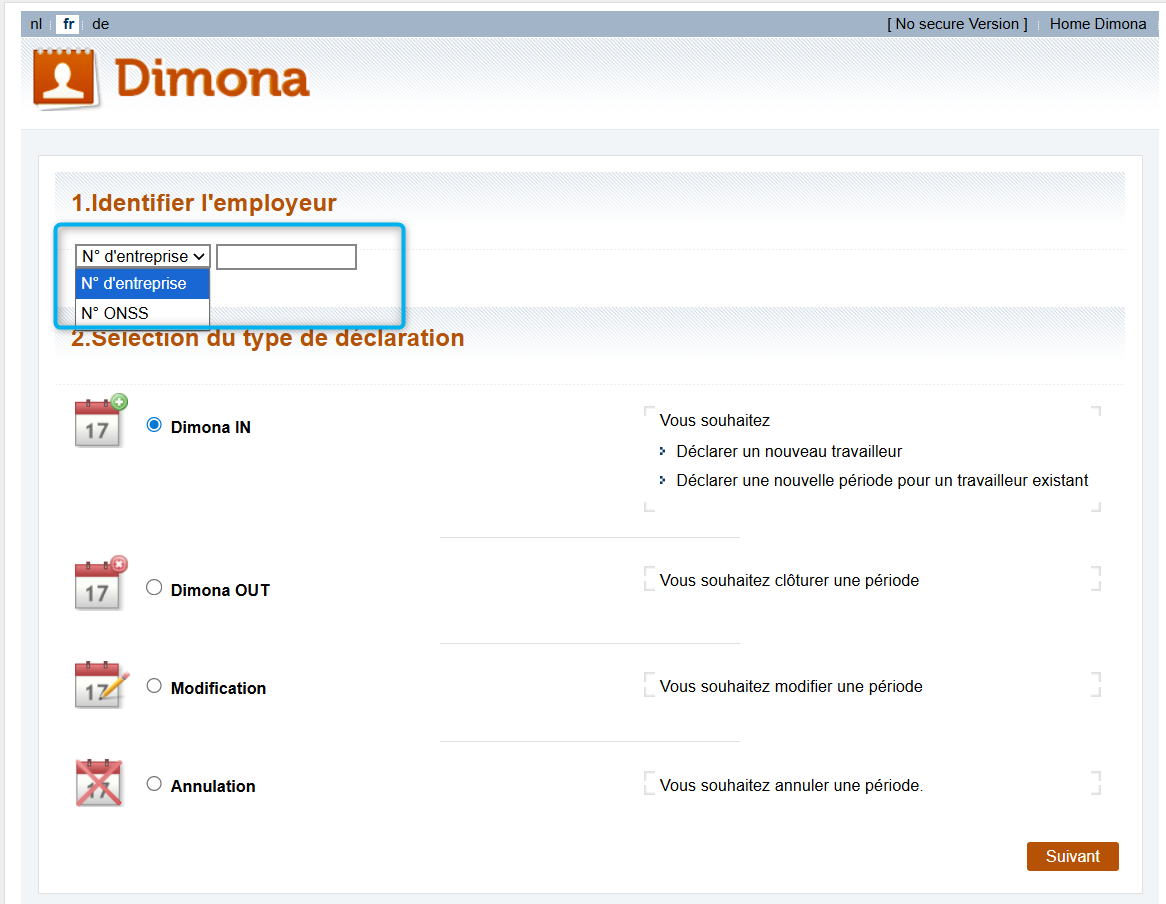
Click on the drop-down menu under Identify the employer (‘1. Identifier l’employeur’ in the screenshot). Select one of two options:
- Enterprise number (‘N° d’entreprise’ in the screenshot)
- NSSO identification number (‘N° ONSS’ in the screenshot)
An employer’s enterprise number is the number listed by the Crossroads Bank for Enterprises (CBE). The NSSO identification number is the number a company obtains after registering as an employer in the online service WIDE.
Fill out the enterprise number or the NSSO identification number in the adjacent field, without dots, dashes or spaces.
Select the type of declaration (‘Sélection du type de déclaration’)
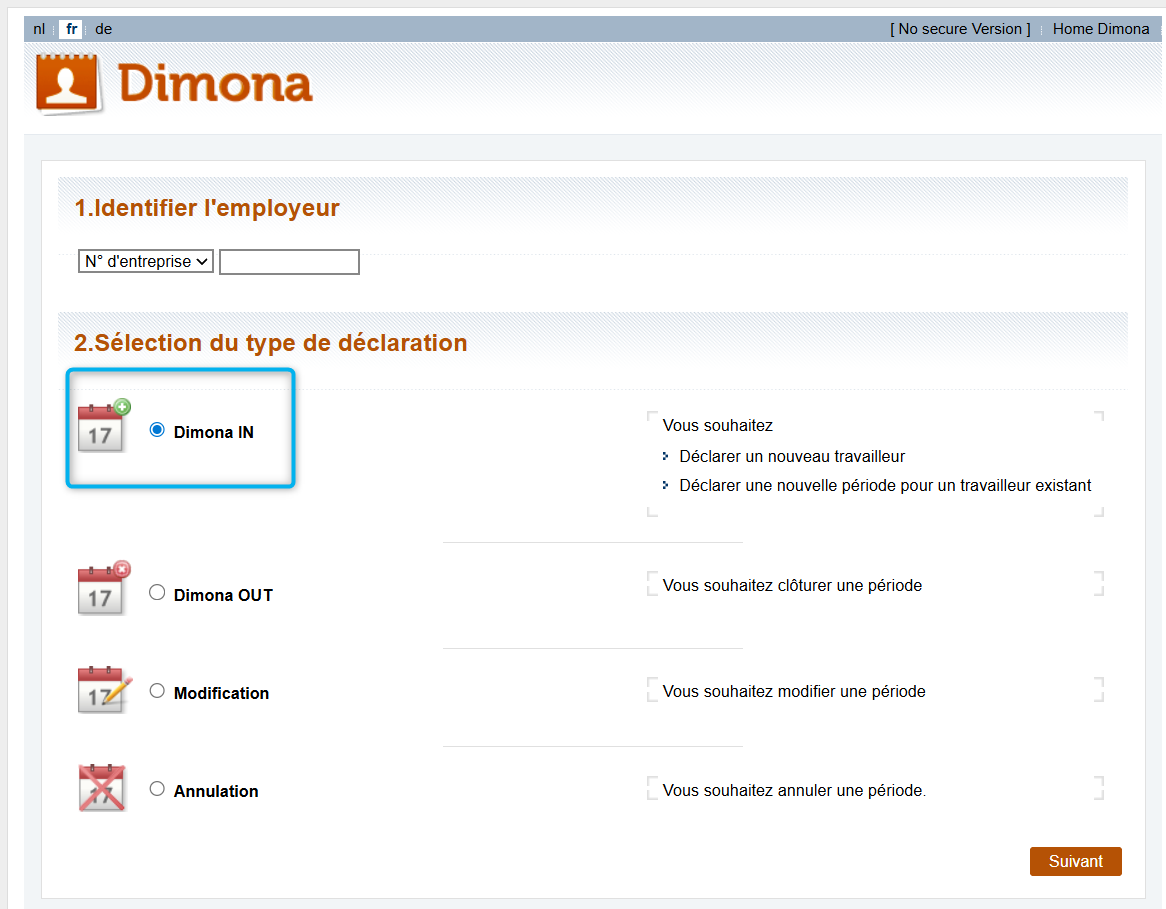
Click the Dimona IN radio button under Selection of the type of declaration (‘2. Sélection du type de déclaration’ in the screenshot).
Click on Next (‘Suivant’ in the screenshot) to continue.
Confirmation of identification of the employer (‘Identification de l’employeur’)
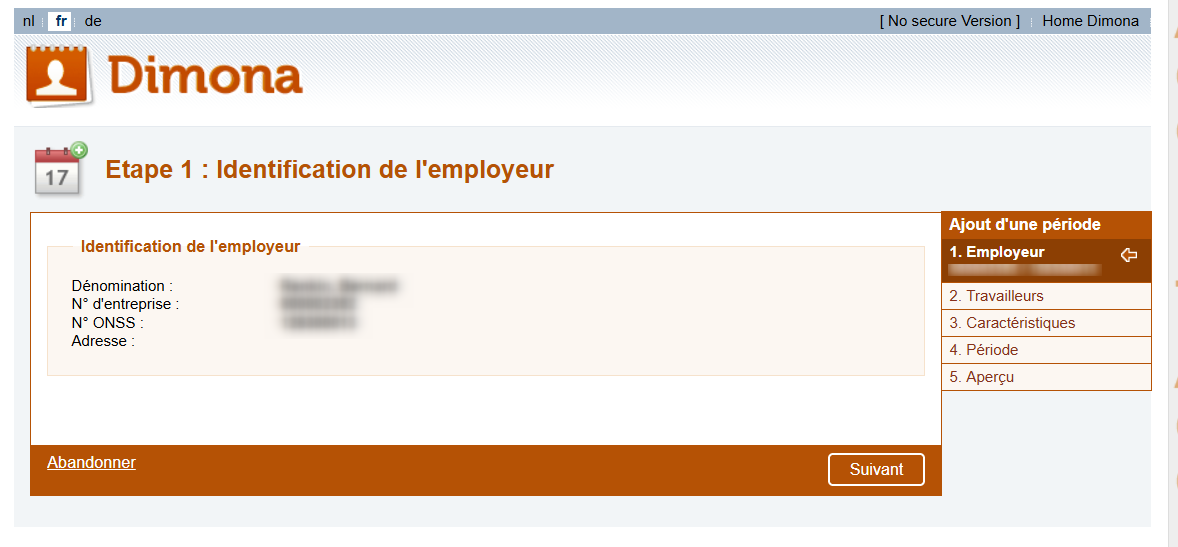
After having filled out the Enterprise number or NSSO identification number following fields are automatically completed, to the extent they are known:
- the employer’s company name (‘Denomination’ in the screenshot’);
- the enterprise number (‘N° d’entreprise’ in the screenshot);
- the NSSO identification number (‘N° ONSS’ in the screenshot);
- the employer’s address (if available) (‘Adresse’ in the screenshot).
Click on Next (‘Suivant’ in the screenshot) to continue or Discard (‘Abandonner’ in the screenshot) to cancel the declaration.
Identifying the employee (‘Identification du travailleur’)
Where to find the required SSIN number
All workers in Belgium can be uniquely identified by their SSIN (Social Security Identification Number) (‘NISS’ in the screenshot). You need it for the Dimona declaration and you can find your employee’s SSIN on the following official documents :
- the electronic identity card (eID);
- the electronic card issued to EU nationals staying in Belgium;
- the residence permit issued to nationals of non-EU countries staying in Belgium;
- the isi+ card (issued by a healthcare fund) for all persons who don’t have an electronic identity document but enjoy Belgian social security coverage.
Identifying the employee when you know the SSIN
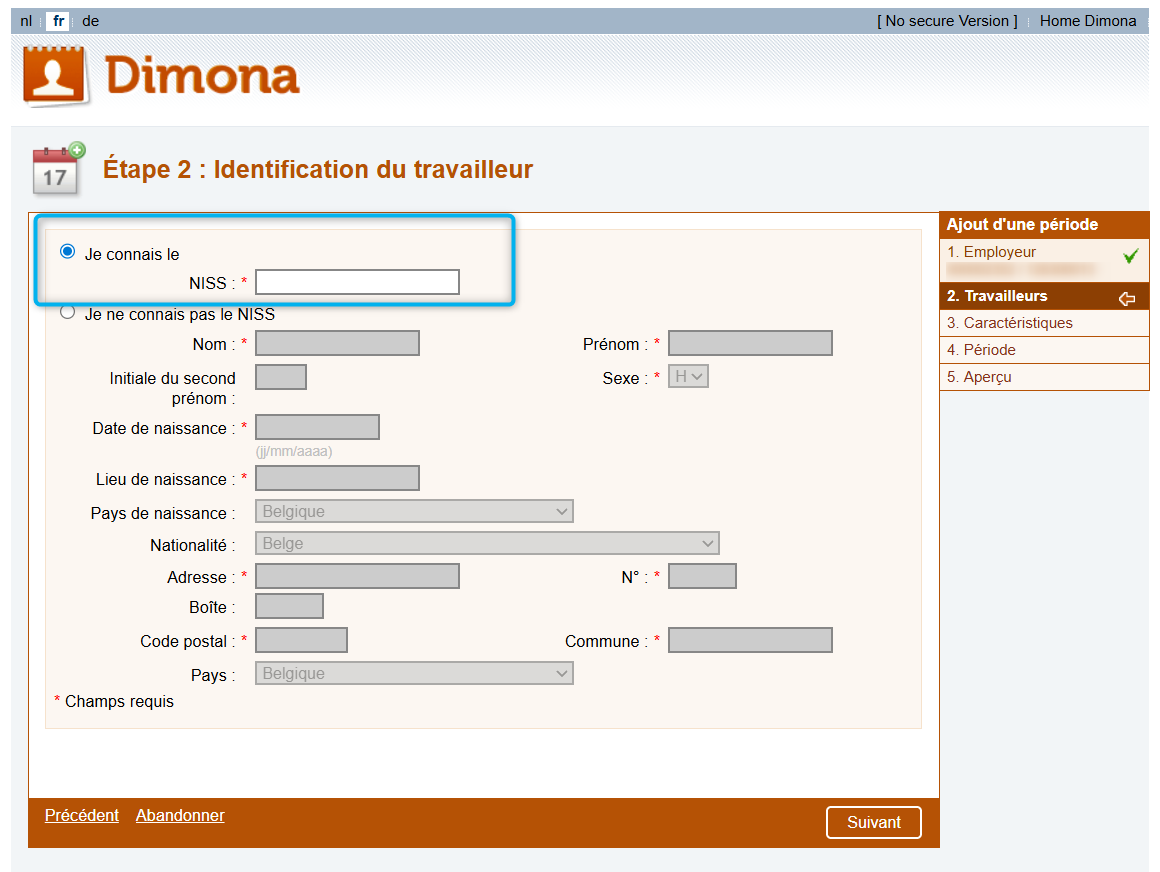
Click the radio button I know the SSIN (‘Je connais le NISS’ in the screenshot) and fill out the SSIN in the adjacent field.
Click on Next (‘Suivant’ in the screenshot) to continue or Discard (‘Abandonner’ in the screenshot) to cancel the declaration. Click on Previous (‘Précédent’ in the screenshot) to return to the previous screen.
Identifying the employee when you don’t know the SSIN
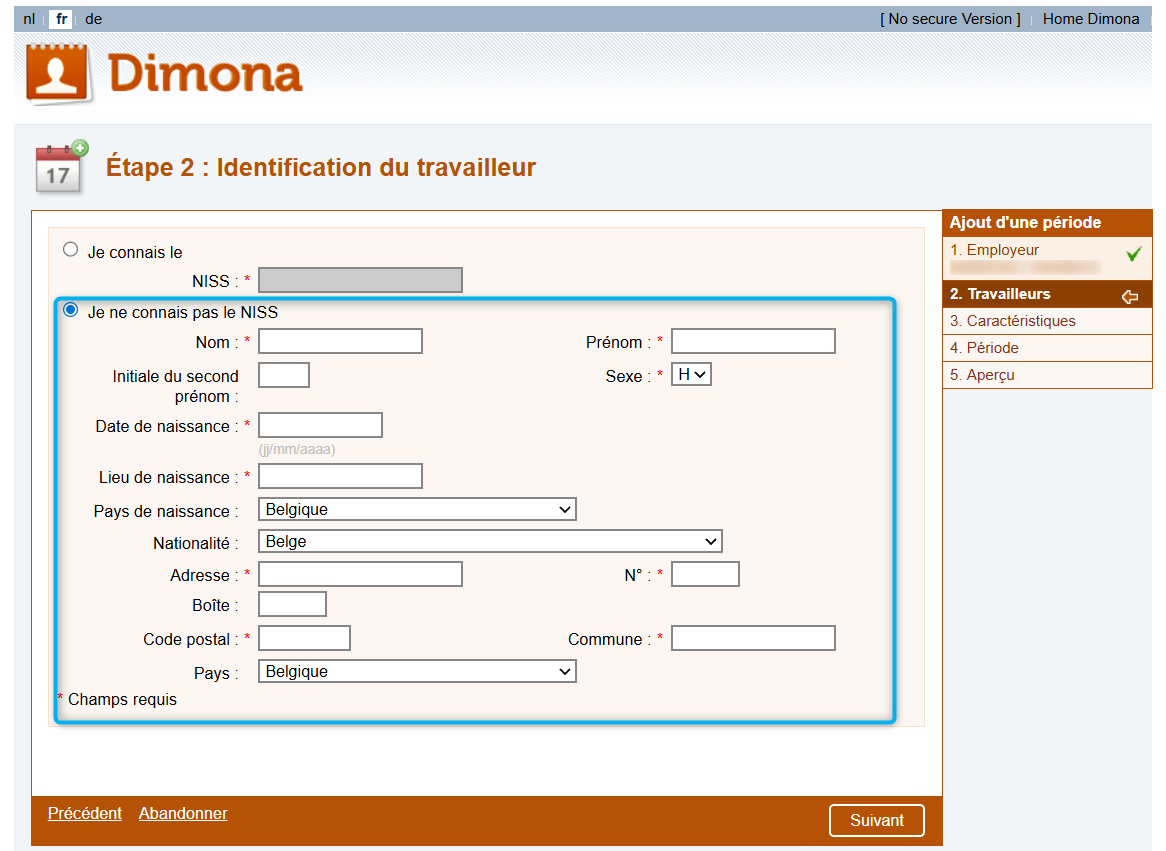
Click the radio button I don’t know the SSIN (‘Je ne connais pas le NISS’ in the screenshot) and fill out the following fields (fields marked with an asterisk (*) are mandatory):
- Family name (‘Nom’ in the screenshot );
- Given name (‘Prénom’ in the screenshot);
- Initial of the middle name (‘lnitiale du second prénom’ in the screenshot);
- Gender (‘Sexe’ in the screenshot);
- Birth date (‘Date de naissance’ in the screenshot);
- Place of birth (‘Lieu de naissance’ in the screenshot);
- Country of birth (‘Pays de naissance’ in the screenshot);
- Nationality (‘Nationalité’ in the screenshot);
- Address (‘Adresse’ in the screenshot);
- House number (‘N°’ in the screenshot);
- Mailbox (‘Boîte’ in the screenshot);
- Postal code (‘Code postal’ in the screenshot);
- City (‘Commune’ in the screenshot);
- Country (‘Pays’ in the screenshot).
Click on Next (‘Suivant’ in the screenshot) to continue or Discard (‘Abandonner’ in the screenshot) to cancel the declaration. Click on Previous (‘Précédent’ in the screenshot) to return to the previous screen.
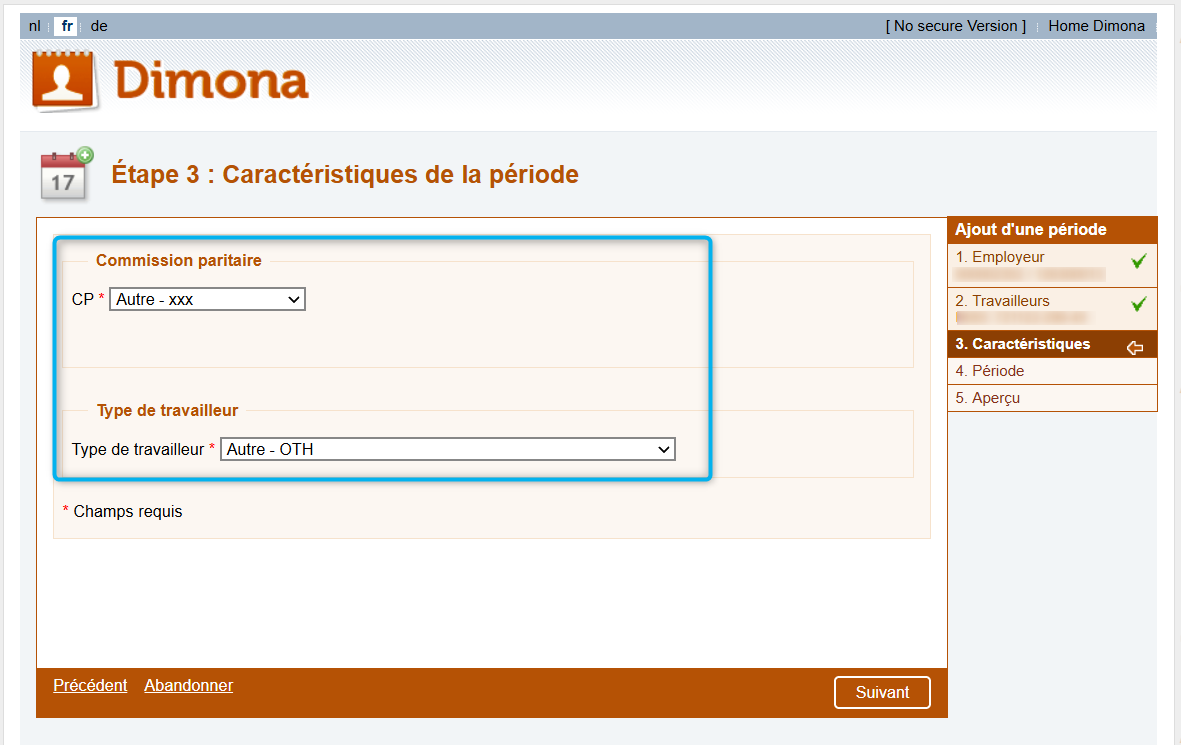
Specify the working period (‘Caractéristiques de la période’)
In this step you must select:
- the Joint committee to which the employee belongs (‘Commission Paritaire’ in the screenshot)
- the Type of worker (‘Type de travailleur’ in the screenshot)
Selecting the joint committee
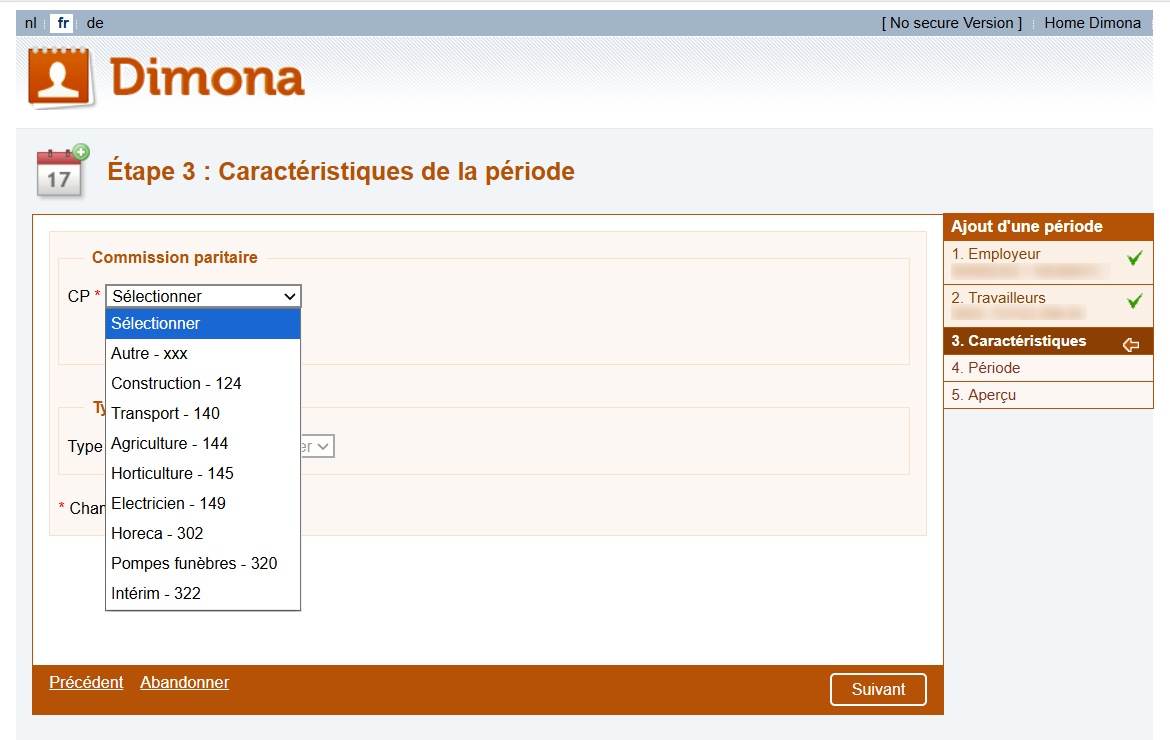
Choose the relevant Joint committee (‘Commission Paritaire’ in the screenshot) by clicking on the CP drop-down menu. Select one of the options presented in the drop-down:
- Other - XXX
- Construction - 124
- Transport - 140
- Agriculture - 144
- Horticulture - 145
- Electricity - 149 (‘Electricien - 149’ in the screenshot)
- Hospitality – 302 (‘Horeca - 302’ in the screenshot)
- Funeral business - 320 (‘Pompes funèbres - 320’ in the screenshot)
- Temporary staffing – 322 (‘Intérim - 322’ in the screenshot)
Click on Next (‘Suivant’ in the screenshot) to continue or Discard (‘Abandonner’ in the screenshot) to cancel the declaration. Click on Previous (‘Précédent’ in the screenshot) to return to the previous screen.
Table giving the complete list of possible joint committees, their short and full description:
| Joint Committee | Description | Full description |
|---|---|---|
| XXX | Other | Other sectors. |
| 124 | Construction | For workers and apprentices in the construction sector. |
| 140 | Transport | For workers and apprentices in the transport sector. |
| 144 | Agriculture | For occasional workers in the agricultural sector. |
| 145 | Horticulture | For occasional workers in the horticultural sector. |
| 149 | Electricity | For workers covered by the joint sub-committee for electricians (installation and distribution - SCP 149.01). |
| 302 | Hospitality | For occasional workers in hospitality. |
| 320 | Funeral business | For occasional workers in the funeral industry. |
| 322 | Temporary staffing | For workers and employees in the temporary sector. |
Consult more detailed information on joint committees in the Dimona key data page in the Administrative Instructions section of the Social security enterprise portal (in French).
Selecting the type of worker
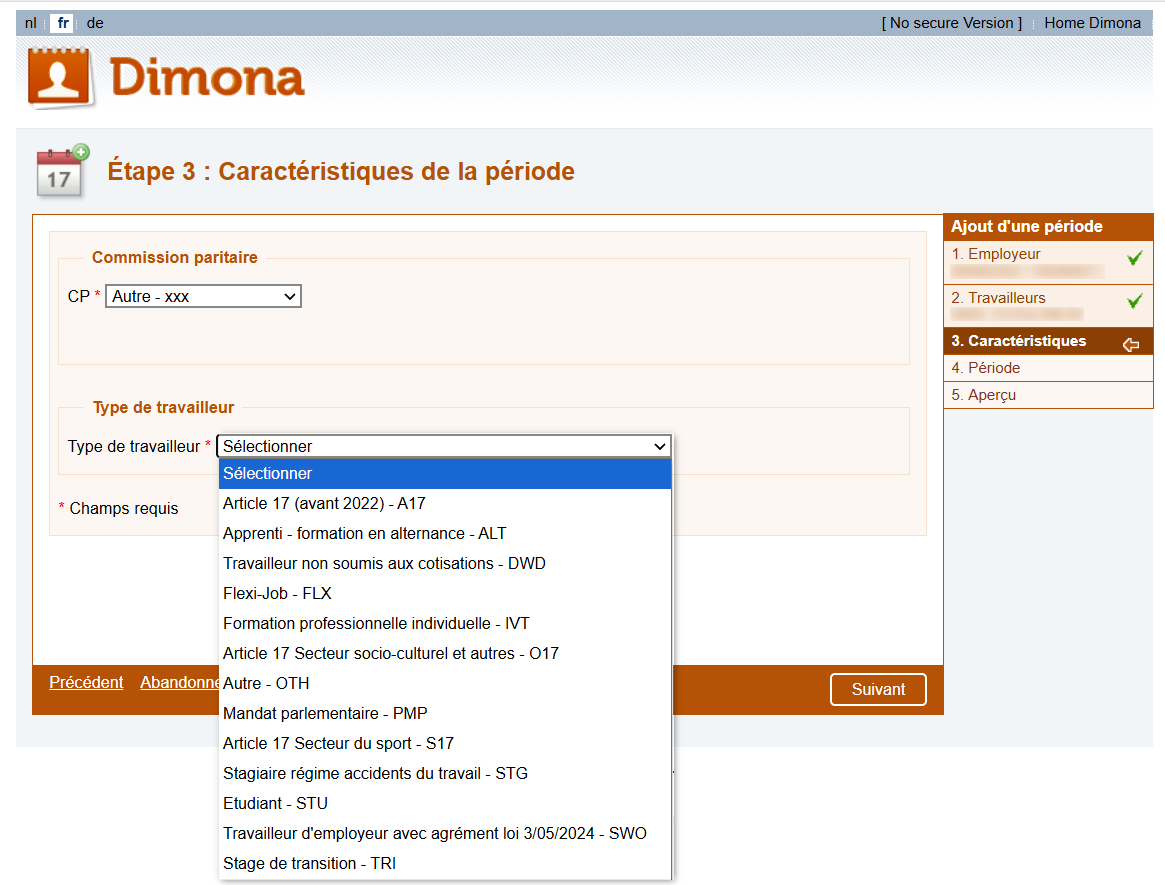
Choose the Type of worker (‘Type de travailleur’ in the screenshot) by clicking on the drop-down menu. Select one of the presented options, their availability depends on the joint committee you selected in the previous step.
The following table lists all possible type of workers, listed in English, in French, as well as with a short and full description. Beware! A specific joint committee only shows a selection of these type of workers.
| Type of worker (English) | Type of worker (French) | Description | Full description |
|---|---|---|---|
| Apprentice - recognised or similar | Apprenti agréé ou assimilé | RTA | Trainees working in construction. |
| Apprentice – alternated learning | Apprenti en formation en alternance | ALT | Trainees – alternated learning (from 1 September 2023 onwards) |
| Article 17 | Article 17 | A17 | Those working in socio-cultural work before 2022. |
| Article 17 – sports sector | Article 17 Secteur du sport | O17 | Those working in sports working in accordance with Article 17. |
| Article 17 – socio-cultural and other sectors | Article 17 – secteur socio-culturel et autres | S17 | Others working in accordance with Article 17. |
| Article 17 – public TV | Article 17 – TV publique | T17 | Those working for radio/TV in accordance with Article 17. |
| Other | Autre | OTH | Others, students included, not represented in any other category of Type of worker. |
| Student | Etudiant | STU | Students only: workers having a specific student contract, enjoying reduced social contributions. |
| Flexi-job | Flexi-job | FLX | Flexi-job workers. |
| Individual vocational training | Formation professionelle individuelle | IVT | Persons bound by an individual vocational training called ‘Plan Formation Insertion’ / ‘Contrat Formation Insertion’, ‘Formation Professionnelle Individuelle’ or ‘Individuele beroepsopleiding’. |
| Parliamentary mandate | Mandat parlementaire | PMP | Members of parliament and ‘protected’ local mandataries. |
| Transitional apprenticeship | Stage de transition | TRI | People who are doing a transitional internship at an employer but still have unemployment status. |
| Internship under accident at work scheme | Stage régime accidents du travail | STG | Non-subjected interns, when they are doing training for remunerative employment, except when to be declared as coded IVT (Individual vocational training) or TRI (Transitional apprenticeship). |
| Construction worker | Travailleur du secteur de la construction | BCW | Construction workers. |
| Worker not submitted to contributions | Travailleur non soumis aux cotisations | DWD | ‘Dimona without DmfA’: a worker who needs to be included in Dimona but not in DmfA. |
| Occasional worker | Travailleur occasionnel | EXT | Occasional workers. |
| Employee of an employer with a licence under the Act of 3 May 2024 | Travailleur d'employeur avec agrément loi 3/05/2024 | SWO | An employee of an employer holding the licence provided for under the Act of 3 May 2024 |
Consult more detailed information on type of worker in the Dimona key data page in the Administrative Instructions section of the Social security enterprise portal (in French).
Click on Next (‘Suivant’ in the screenshot) to continue or Discard (‘Abandonner’ in the screenshot) to cancel the declaration. Click on Previous (‘Précédent’ in the screenshot) to return to the previous screen.
Enter start and ending dates of the working period (‘Détails de la période’)
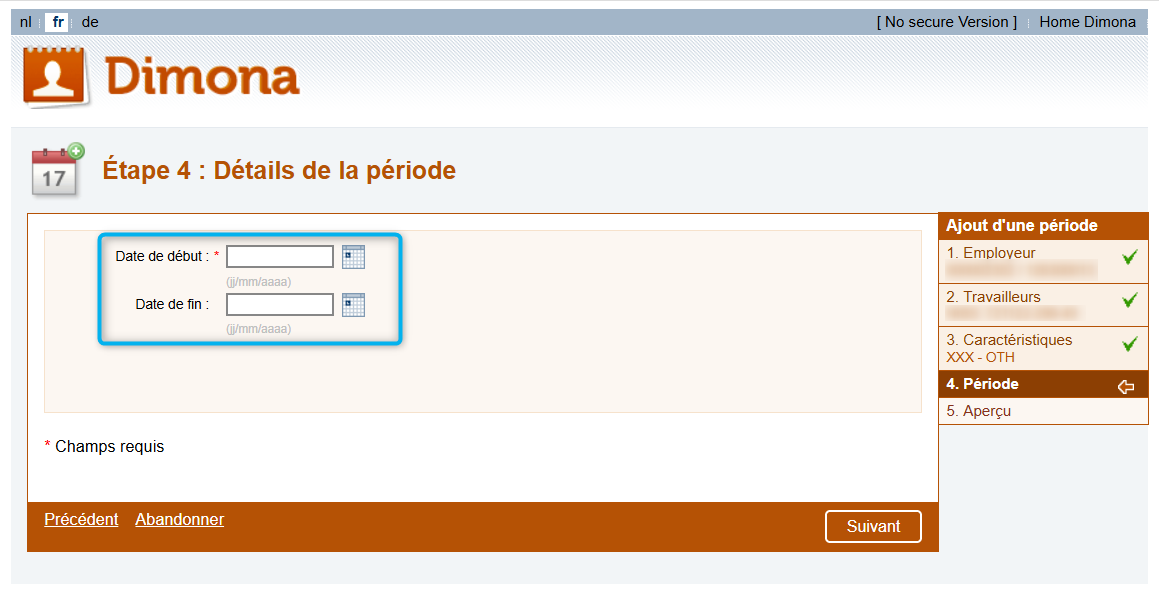
Provide the starting and ending date of the working period, i.e. the period during which the employee has an employment relationship with the employer:
- Fill out the start of the working period in the field adjacent to Starting date (‘Date de début’ in the screenshot) in format ‘dd/mm/yyyy’ or click on the calendar icon to select a starting date.
- Fill out the end date in the field adjacent to Ending date (‘Date de fin’ in the screenshot) in format ‘dd/mm/yyyy’ or click on the calendar icon to select an ending date.
Beware!
- For some types of workers the end date is mandatory. In that case the field Ending Date has an asterisk (*).
- For occasional workers (EXT) you also need to submit a start and end time, according to the type of contract.
- For students (STU) you also need to submit a start and end time.
Click on Next (‘Suivant’ in the screenshot) to continue or Discard (‘Abandonner’ in the screenshot) to cancel the declaration. Click on Previous (‘Précédent’ in the screenshot) to return to the previous screen.
Consult more detailed information on the different type of workers via the Dimona content page of the Administrative Instructions section of the Social security enterprise portal (in French).
Overview of the Dimona IN declaration (‘Aperçu de la déclaration’)
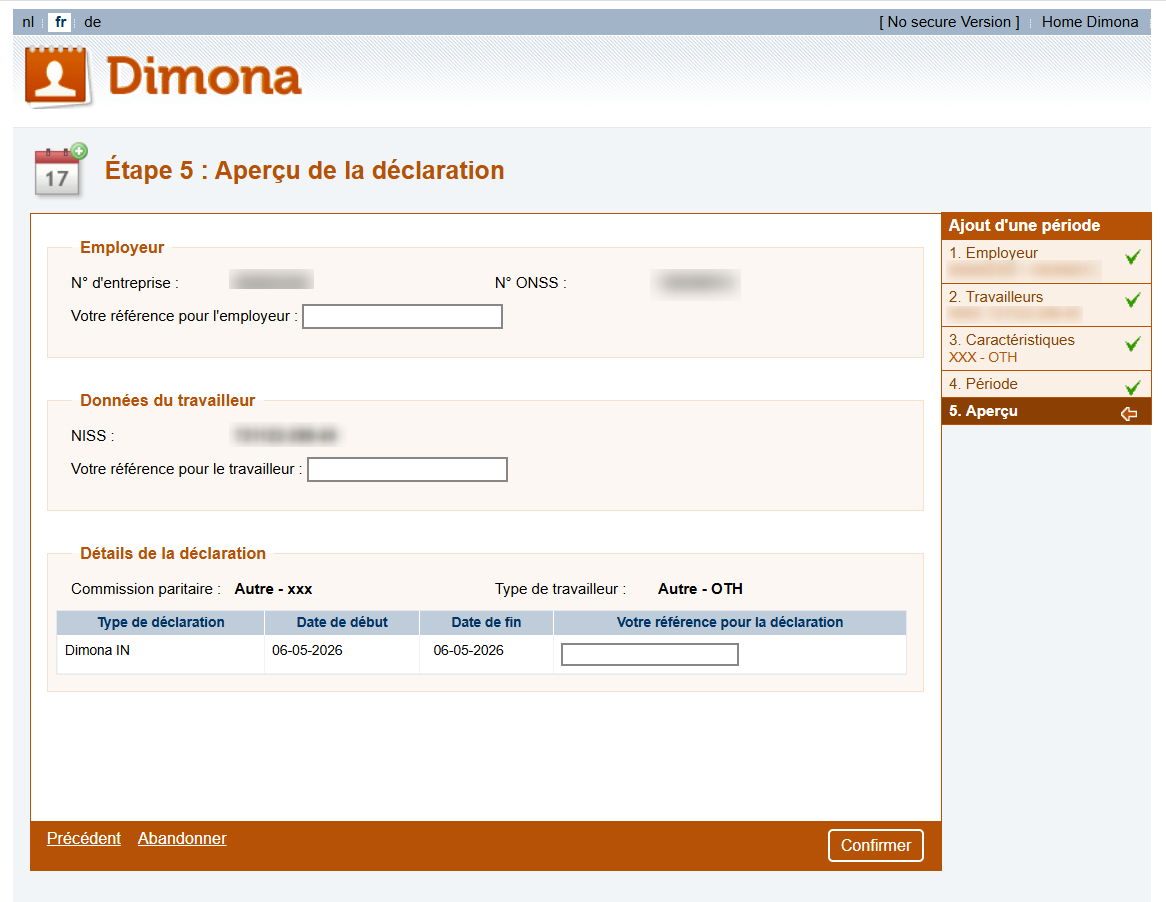
In this step you get an overview of all information concerning your declaration:
- Information on the Employer (‘Employeur’ in the screenshot):
- Check the Enterprise number (‘N° d’entreprise’ in the screenshot);
- Check the NSSO identification number (‘N° ONSS’ in the screenshot);
- Add if needed your company’s reference in the adjacent field (‘Votre référence pour l’employeur in the screenshot).
- Information on the Employee (‘Données du travailleur’ in the screenshot):
- Add if needed your reference for the employee in the adjacent field (‘Votre référence pour le travailleur in the screenshot).
- Information on the Declaration details (‘Détails de la déclaration’ in the screenshot):
- Check the Type of declaration (‘Type de déclaration’ in the screenshot);
- Check the Period number (‘Numéro de période‘ in the screenshot);
- Check the Starting date (‘Date de début’ in the screenshot);
- Check the Ending date (‘Date de fin’ in the screenshot);
- Add if needed your reference for the declaration in the adjacent field (‘Votre référence pour la déclaration’ in the screenshot).
Click on Confirm (‘Confirmer’ in the screenshot) - if all information is correct - to continue or Discard (‘Abandonner’ in the screenshot) to cancel the declaration. Click on Previous (‘Précédent’ in the screenshot) to return to the previous screen, for example to make corrections.
Confirmation of receipt for Dimona IN
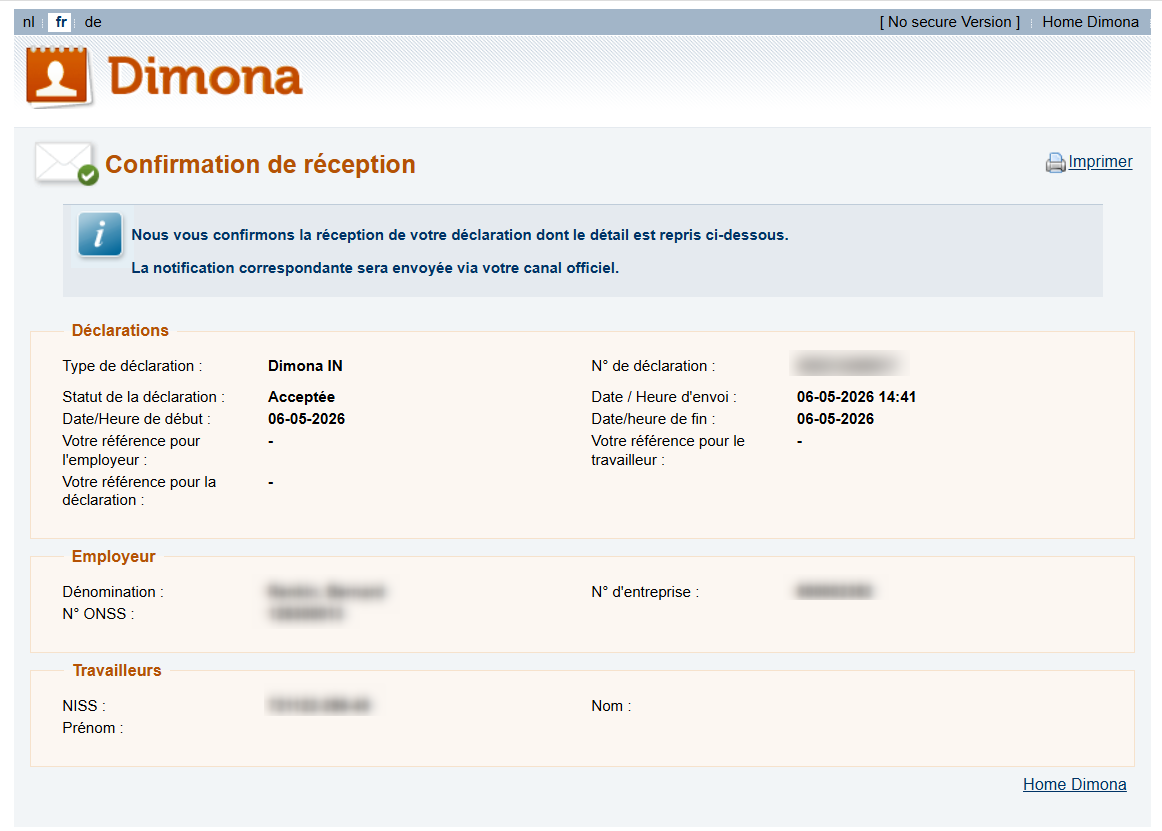
This screen contains a summary overview of your Dimona IN declaration. Your declaration has been completed. Click on Home Dimona to return to the homepage of the Dimona online service.
Use the declaration type Dimona OUT if you want to declare the ending of a period of work for an employee previously declared via Dimona IN. Please remark that you can only use a Dimona OUT if no end date was specified in your Dimona IN. If you want to change the end date originally mentioned in a Dimona IN, please use the Modification function.
A Dimona OUT has the following steps, explained further down:
- Identify the employer.
- Select the type of declaration (Dimona OUT).
- Enter the ending date for your employee.
- Check the overview of your Dimona OUT declaration.
- Get a confirmation of your Dimona OUT declaration.
Identify the employer (‘Identifier l’employeur’)

Click on the drop-down menu under Identify the employer (‘1. Identifier l’employeur’ in the screenshot). Select one of two options:
- Enterprise number (‘N° d’entreprise’ in the screenshot)
- NSSO identification number (‘N° ONSS’ in the screenshot)
An employer’s enterprise number is the number listed by the Crossroads Bank for Enterprises (CBE). The NSSO identification number is the number a company obtains after registering as an employer in the online service WIDE.
Fill out the enterprise number or the NSSO identification number in the adjacent field, without dots, dashes or spaces.
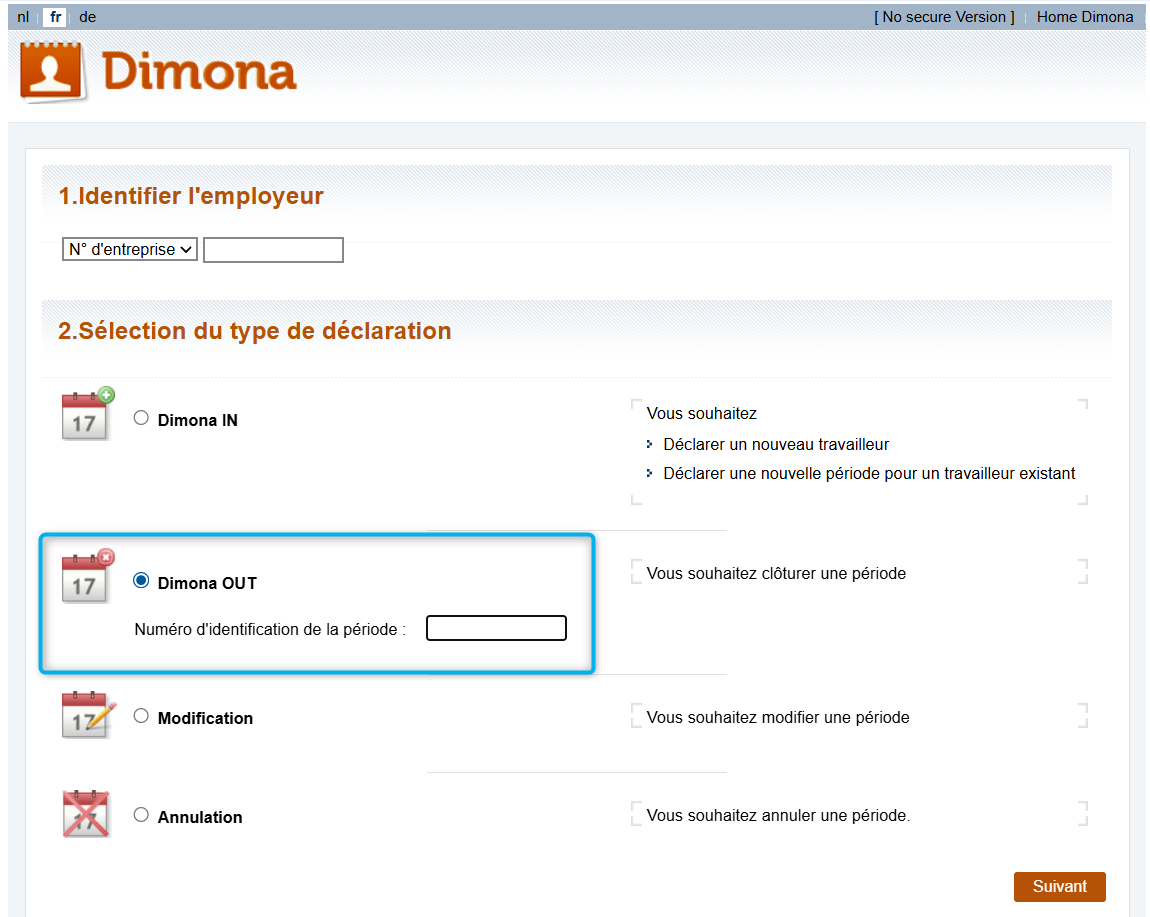
Select the type of declaration (‘Sélection du type de déclaration’)
Click the Dimona OUT radio button under Selection of the type of declaration (‘2. Sélection du type de déclaration’ in the screenshot) and an extra field appears. Fill out the Identification number for the period (‘Numéro d’identification de la période’ in the screenshot) you received after submitting the Dimona IN.
Click on Next (‘Suivant’ in the screenshot) to continue.
Enter the ending date of a period (‘Clôture d’une période’)
To end a period of work for an employee, fill out the Ending date (‘Date de fin’ in the screenshot) in format ‘dd/mm/yyyy’ or click on the calendar icon to select an ending date.
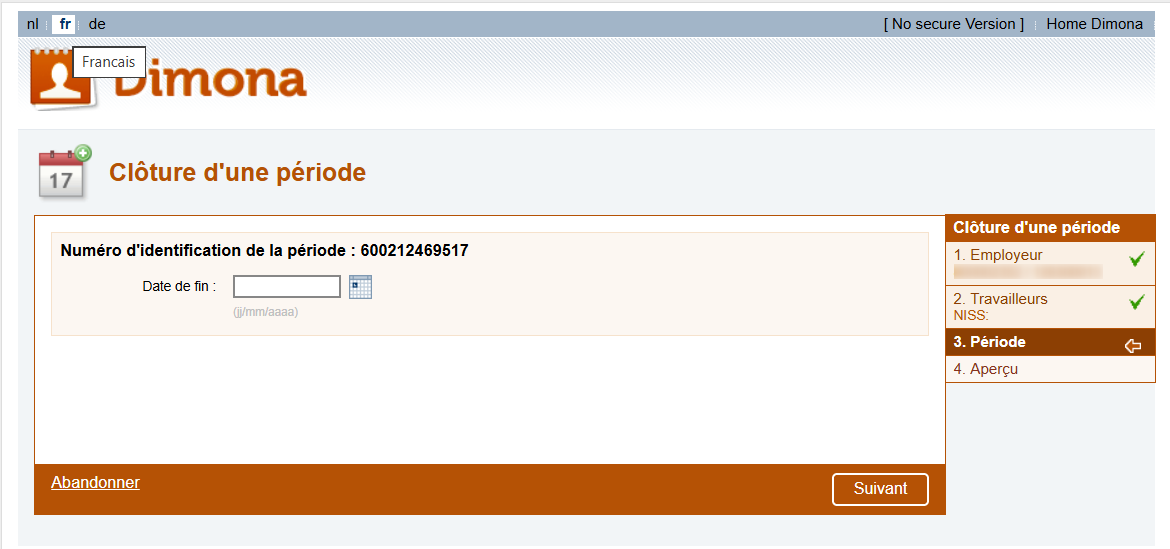
Click on Next (‘Suivant’ in the screenshot) to continue or Discard (‘Abandonner’ in the screenshot) to cancel the declaration.
Overview of the Dimona OUT declaration (‘Aperçu de la déclaration’)
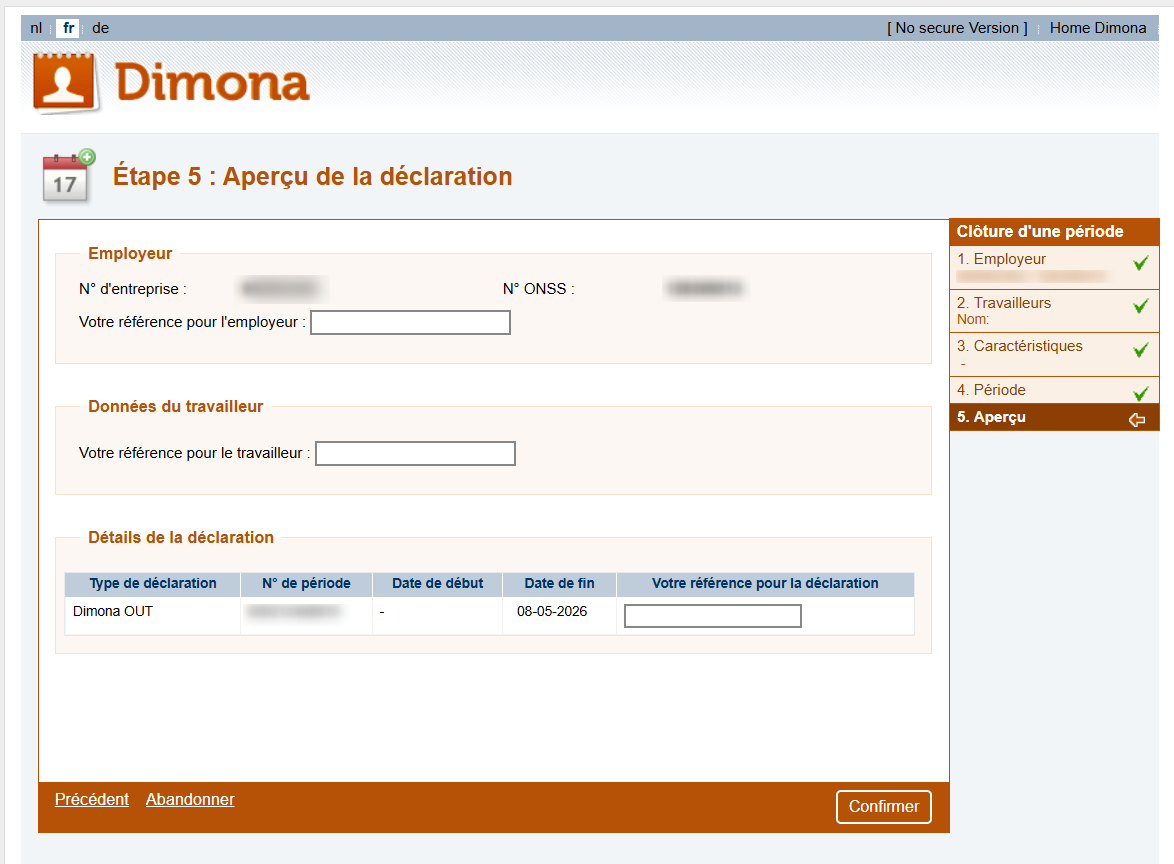
In this step you get an overview of all information concerning your declaration. Please note that references are optional.
- Information on the Employer (‘Employeur’ in the screenshot):
- Check the Enterprise number (‘N° d’entreprise’ in the screenshot);
- Check the NSSO identification number (‘N° ONSS’ in the screenshot);
- Add if needed your company’s reference in the adjacent field (‘Votre référence pour l’employeur in the screenshot).
- Information on the Employee (‘Données du travailleur’ in the screenshot):
- Add if needed your reference for the employee in the adjacent field (‘Votre référence pour le travailleur in the screenshot).
- Information on the Declaration details (‘Détails de la déclaration’ in the screenshot):
- Check the Type of declaration (‘Type de déclaration’ in the screenshot);
- Check the Period number (‘Numéro de période‘ in the screenshot);
- Check the Ending date (‘Date de fin’ in the screenshot);
- Add if needed your reference for the declaration in the adjacent field (‘Votre référence pour la déclaration’ in the screenshot).
Click on Confirm (‘Confirmer’ in the screenshot) - if all information is correct - to continue or Discard (‘Abandonner’ in the screenshot) to cancel the declaration. Click on Previous (‘Précédent’ in the screenshot) to return to the previous screen, for example to make corrections.
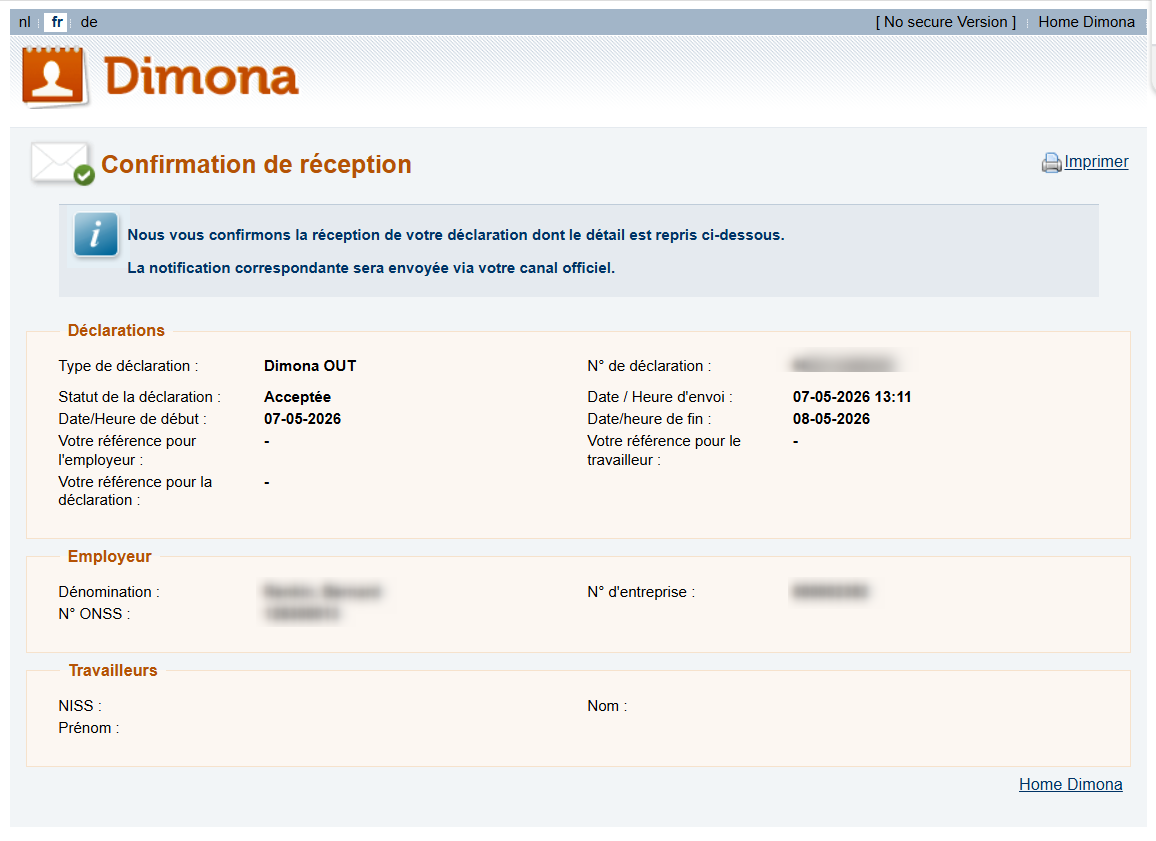
Confirmation of receipt for Dimona OUT

This screen contains a summary overview of your Dimona OUT declaration. Your declaration has been completed. Click on Home Dimona to return to the homepage of the Dimona online service.
Use the declaration type Modification if you want to declare the ending of a period of work for an employee previously declared via Dimona IN.
Following steps apply and are explained furtherly:
- Identify the employer.
- Select the type of declaration (Modification).
- Modify the period of employment for an employee.
- Check the overview of your modified declaration.
- Get a confirmation of your modified declaration.
Identify the employer (‘Identifier l’employeur’)

Click on the drop-down menu under Identify the employer (‘1. Identifier l’employeur’ in the screenshot). Select one of two options:
- Enterprise number (‘N° d’entreprise’ in the screenshot)
- NSSO identification number (‘N° ONSS’ in the screenshot)
An employer’s enterprise number is the number listed by the Crossroads Bank for Enterprises (CBE). The NSSO identification number is the number a company obtains after registering as an employer in the online service WIDE. Read more about WIDE on the Social security enterprise portal (in French).
Fill out the enterprise number or the NSSO identification number in the adjacent field, without dots, dashes or spaces.
Select the type of declaration (‘Sélection du type de declaration’)
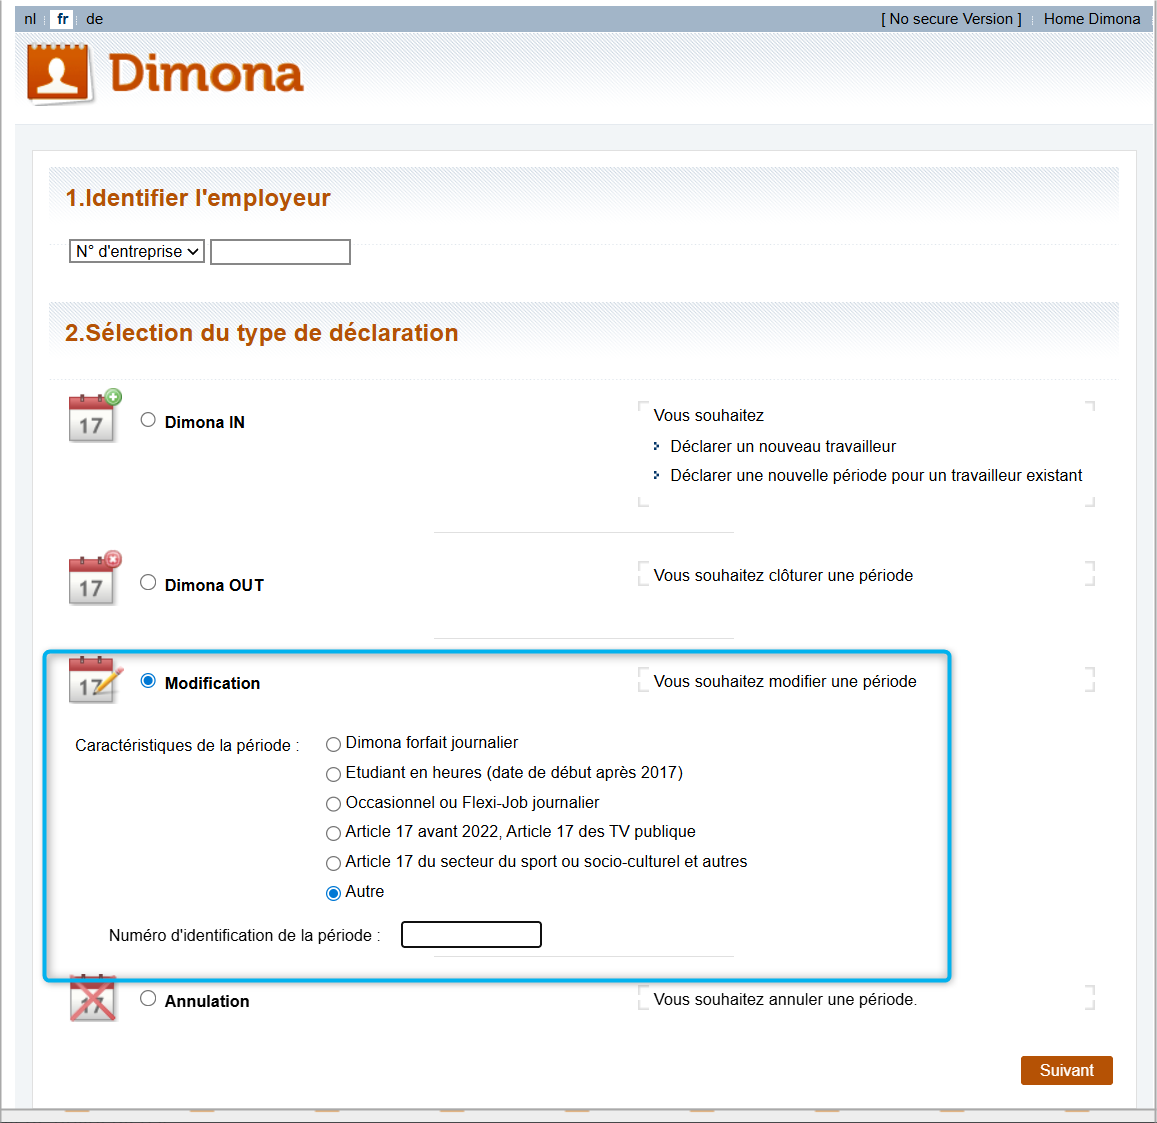
Click the Modification radio button under Selection of the type of declaration (‘2. Sélection du type de déclaration’ in the screenshot) and extra options appear to Specify the period (Caractéristiques de la période’ in the screenshot).
Choose one of following options by clicking the relevant radio button:
- Dimona daily flat rate (‘Dimona forfait journalier’ in the screenshot);
- Student based on hours (starting date after 2017) (‘Etudiant en heures (date de début après 2017)’ in the screenshot);
- Occasional or Flexi-job workers (‘Occasionnel ou Flexi-Job journalier’ in the screenshot);
- Article 17 before 2022, Article 17 Public TV (‘Article 17 avant 2022, Article 17 des TV publiques’ in the screenshot);
- Article 17 sports or socio-cultural sector and others (‘Article 17 du secteur du sport ou socio-culturel et autre’s in the screenshot);
- Other (‘Autre’ in the screenshot).
Fill out the Identification number for the period (‘Numéro d’identification de la période’ in the screenshot) you received after submitting the Dimona IN.
Click on Next (‘Suivant’ in the screenshot) to continue.
Modifying a period (‘Modification d’une période’)
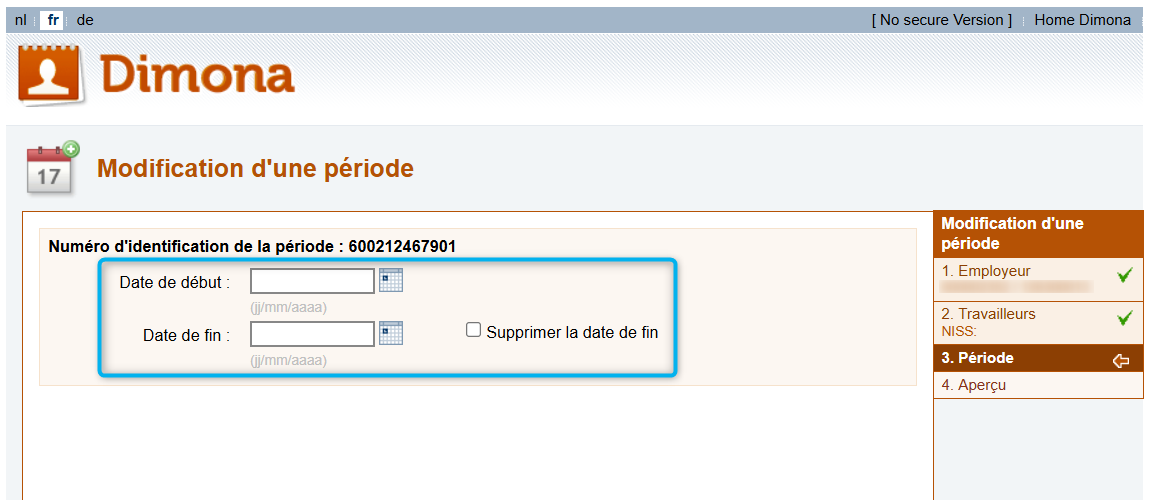
To modify a period of work for an employee, change the Starting date (‘Date de début’ in the screenshot) and/or the Ending date (‘Date de fin’ in the screenshot) in format ‘dd/mm/yyyy’ or click on the calendar icon to select a date.
Click on Next (‘Suivant’ in the screenshot) to continue or Discard (‘Abandonner’ in the screenshot) to cancel the declaration.
Overview of the Modification declaration (‘Aperçu de la déclaration’)
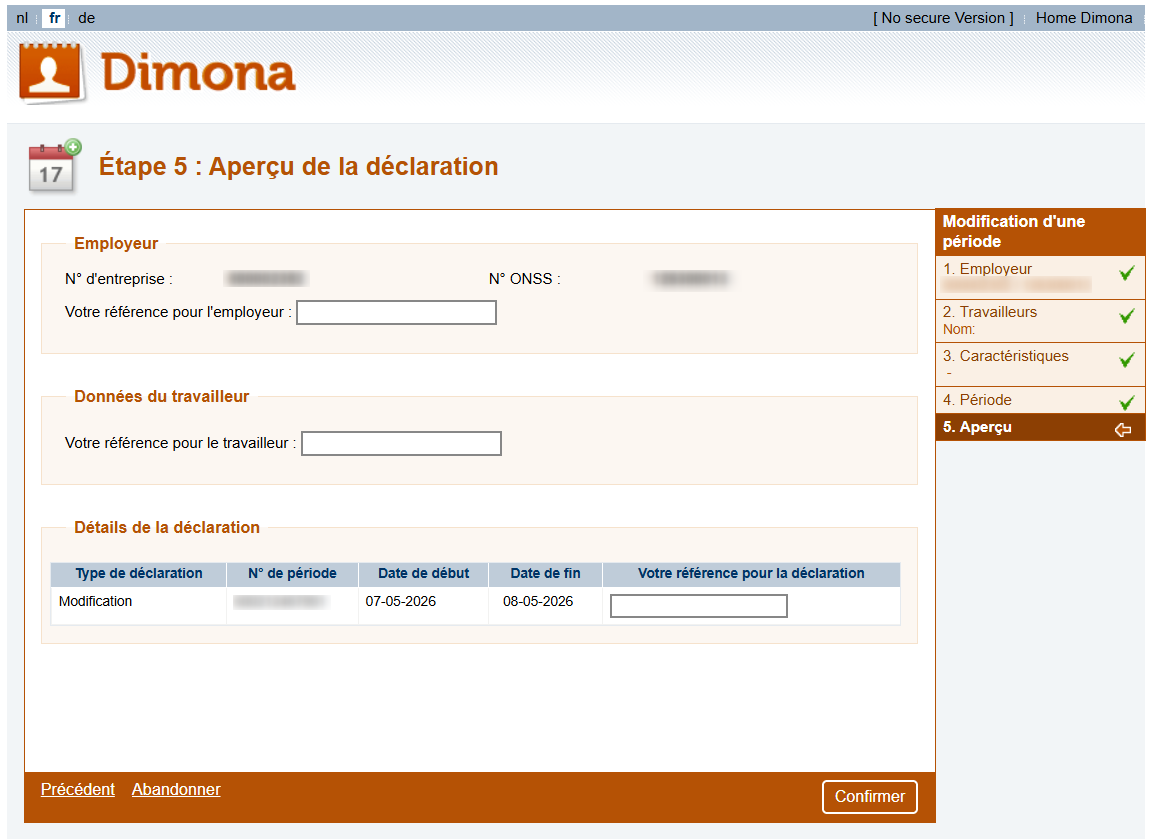
In this step you get an overview of all information concerning your declaration:
- Information on the Employer (‘Employeur’ in the screenshot):
- Check the Enterprise number (‘N° d’entreprise’ in the screenshot);
- Check the NSSO identification number (‘N° ONSS’ in the screenshot);
- Add if needed your company’s reference in the adjacent field (‘Votre référence pour l’employeur’ in the screenshot).
- Information on the Employee (‘Données du travailleur’ in the screenshot):
- Add if needed your reference for the employee in the adjacent field (‘Votre référence pour le travailleur in the screenshot).
- Information on the Declaration details (‘Détails de la déclaration’ in the screenshot):
- Check the Type of declaration (‘Type de déclaration’ in the screenshot);
- Check the Period number (‘Numéro de période‘ in the screenshot);
- Check the Starting date (‘Date de début’ in the screenshot);
- Check the Ending date (‘Date de fin’ in the screenshot);
- Add if needed your reference for the declaration in the adjacent field (‘Votre référence pour la déclaration’ in the screenshot).
Click on Confirm (‘Confirmer’ in the screenshot) - if all information is correct - to continue or Discard (‘Abandonner’ in the screenshot) to cancel the declaration. Click on Previous (‘Précédent’ in the screenshot) to return to the previous screen, for example to make corrections.
Confirmation of receipt for a Modification in Dimona
Confirmation of receipt visible within Dimona
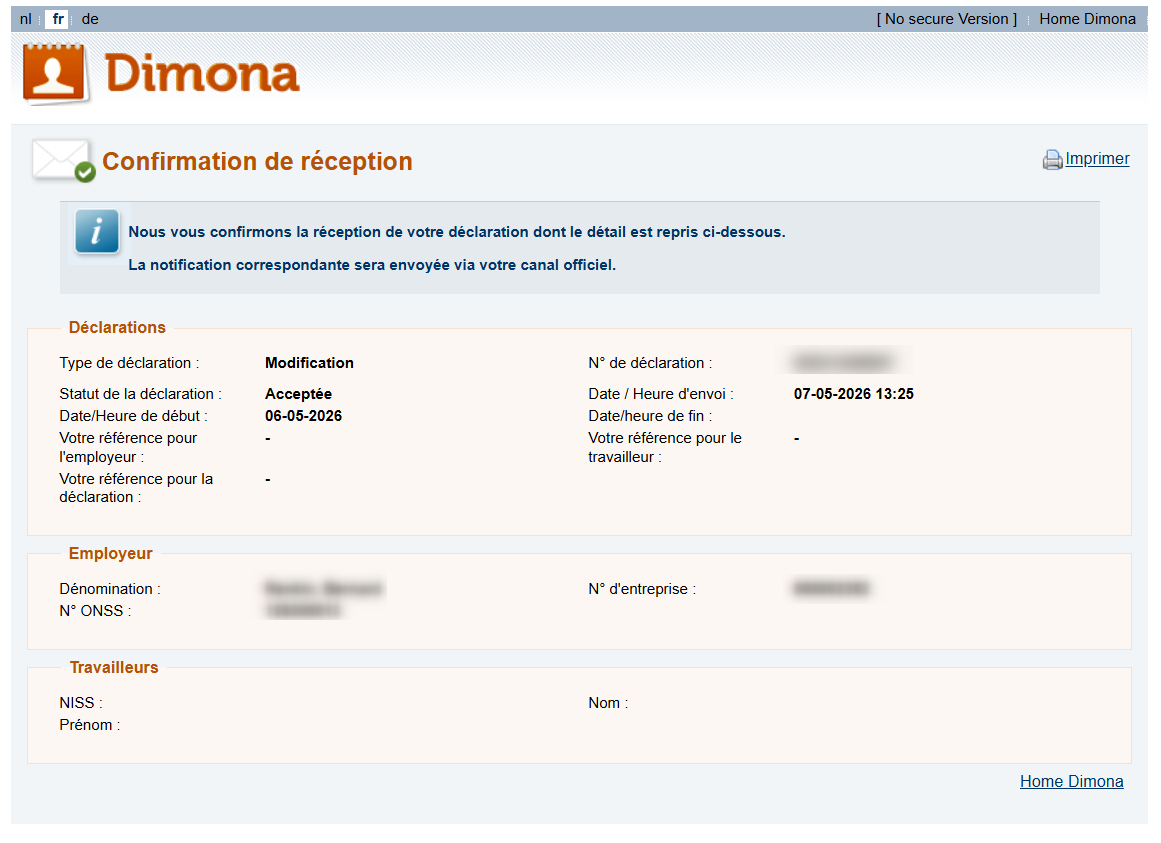
This screen gives a summary overview of your declaration of Modification. Your declaration has been completed. Click on Home Dimona to return to the homepage of the Dimona online service.
Use the declaration type Cancellation (‘Annulation’ in French) if you want to cancel a period of work for an employee previously declared via Dimona IN.
Following steps apply and are explained furtherly:
- Identify the employer.
- Select the type of declaration (Cancellation).
- Check the overview of your cancelled declaration.
- Get a confirmation of your cancelled declaration.
Identify the employer (‘Identifier l’employeur’)
Click on the drop-down menu under Identify the employer (‘1. Identifier l’employeur’ in the screenshot). Select one of two options:
- Enterprise number (‘N° d’entreprise’ in the screenshot)
- NSSO identification number (‘N° ONSS’ in the screenshot)
An employer’s enterprise number is the number listed by the Crossroads Bank for Enterprises (CBE). The NSSO identification number is the number a company obtains after registering as an employer in the online service WIDE.
Fill out the enterprise number or the NSSO identification number in the adjacent field, without dots, dashes or spaces.
Select the type of declaration (‘Sélection du type de déclaration)

Click the Cancellation (‘Annulation’ in the screenshot) radio button under Selection of the type of declaration (‘2. Sélection du type de déclaration’ in the screenshot) and enter the Identification number for the period (‘Numéro d’identification de la période’ in the screenshot) you received after submitting the Dimona IN.
Click on Next (‘Suivant’ in the screenshot) to continue.
Overview of the Cancellation declaration (‘Aperçu de la déclaration’)
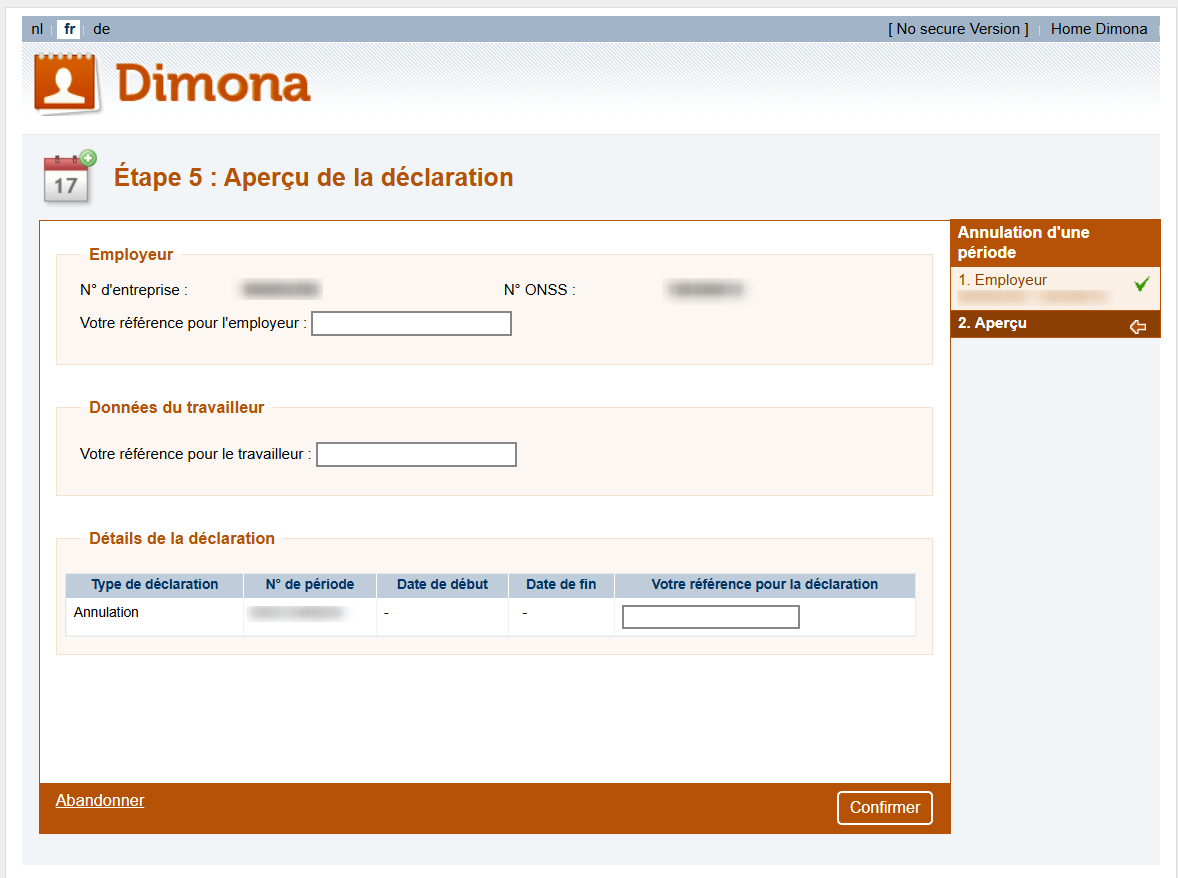
In this step you get an overview of all information concerning your declaration:
- Information on the Employer (‘Employeur’ in the screenshot):
- Check the Enterprise number (‘N° d’entreprise’ in the screenshot);
- Check the NSSO identification number (‘N° ONSS’ in the screenshot);
- Add if needed your company’s reference in the adjacent field (‘Votre référence pour l’employeur’ in the screenshot).
- Information on the Employee (‘Données du travailleur’ in the screenshot):
- Add if needed your reference for the employee in the adjacent field (‘Votre référence pour le travailleur in the screenshot).
- Information on the Declaration details (‘Détails de la déclaration’ in the screenshot):
- Check the Type of declaration (‘Type de déclaration’ in the screenshot);
- Check the Period number (‘Numéro de période‘ in the screenshot);
- Add if needed your reference for the declaration in the adjacent field (‘Votre référence pour la déclaration’ in the screenshot).
Click on Confirm (‘Confirmer’ in the screenshot) - if all information is correct - to continue or Discard (‘Abandonner’ in the screenshot) to cancel the declaration. Click on Previous (‘Précédent’ in the screenshot) to return to the previous screen, for example to make corrections.
Confirmation of receipt of a Cancellation in Dimona
Confirmation of receipt visible within Dimona
This screen contains a summary overview of the declaration of Cancellation. Your declaration has been completed. Click on Home Dimona to return to the homepage of the Dimona online service.
You also receive a confirmation of receipt of the declaration outside of the online service Dimona, via:
- your e-Box Enterprise account (unless you are a batch sender), or
- by post if you haven’t appointed an Access Manager to access the secured environment of the Social security portal.
Access Managers are appointed by a company’s Chief Access Manager. They can then manage the users and grant them access to the various online services.
This confirmation, which will be written in French, Dutch or German, depending on the language you have chosen, contains the status of your declaration, being either:
- Accepted (‘Acceptée’ in French),
- Refused (‘Refusée’ in French), or
- Pending (‘En attente’ in French).
Beware! Only when your declaration is labeled with an Accepted status, it can be regarded as valid.
The confirmation contains 3 parts.
- The part Declarations (‘Déclarations’ in French) includes all general information related to the declaration:
- The type of declaration you submitted (Dimona IN; Dimona OUT; Modification or Cancellation);
- The declaration number (‘numéro de déclaration’ in French), i.e. the reference given to your submitted declaration by Dimona;
- The status of the declaration:
- Accepted (‘Acceptée’ in French): the declaration is valid (complete and correct) and the submitted period has been registered.
- Refused (‘Refusée’ in French): the declaration is not valid. The reason of refusal is given in the form of a code and a description of the code. Find out more on the meaning of these codes in the Dimona Glossary of the Social security enterprise portal (in French). On the Dimona Glossary homepage, click on Latest version (‘Dernière version’ in French) in the menu and on Search (‘Recherche’ in French) in the drop-down menu. Click on the looking glass and fill out the fields to do a search.
- Pending (‘En attente’ in French): the declaration awaits validation.
- The date and time of sending, which corresponds with the reception of your application by the social security office;
- The starting date and time;
- Your employer reference;
- Your worker reference;
- Your declaration reference.
- The part Employer (‘Employeur’ in French) includes all information related to the employer:
- The employer’s company name (‘dénomination’ in French);
- Enterprise number (‘Numéro d’entreprise’ in French)
- NSSO identification number (Numéro d’identification ONSS’ in French)
- The part Employees (‘Travailleurs’ in French) includes all information related to the employee:
- The Social Security Identification Number (SSIN) of the employee;
- The family name of the employee;
- The given name of the employee.

Funded by the European Union – NextGenerationEU. Views and opinions expressed are however those of the author(s) only and do not necessarily reflect those of the European Union or European Commission. Neither the European Union nor the European Commission can be held responsible for them.
National Social Security Office (NSSO)
- Address: Place Victor Horta, 11 - 1060 Brussels
- Telephone: +32 (0)2 509 59 59
- Website: www.onss.be (in french)
You can also get in touch via our Contact page.


